Claim Management
Last updated: June 29, 2026
Understanding healthcare claims is essential for effective revenue cycle management in any healthcare practice. A comprehensive understanding of claim management helps ensure accuracy, reduce errors, and maintain compliance, ultimately leading to fewer denials and faster reimbursements. This article thoroughly examines the Canvas claim process, including superbill creation and usage, to empower practices to optimize their financial health.
User's Guide
Structure of the Claim
Claim Header
Displays key patient and visit details. Actions such as changing queues, snoozing claims, or editing information from the triple dot menu are possible through the header.
Click the patient’s name to navigate to their profile or the note link to access the associated note.

Claim Ledger
The claim ledger displays charges, payments adjustments and current balance for payers and patients. The ledger can be expanded by clicking on the + next to each payer or patient for a further breakdown by CPT
Shows charges, payments, adjustments, and balances for payers and patients.
Click the + icon to expand sections for a detailed breakdown by CPT codes.
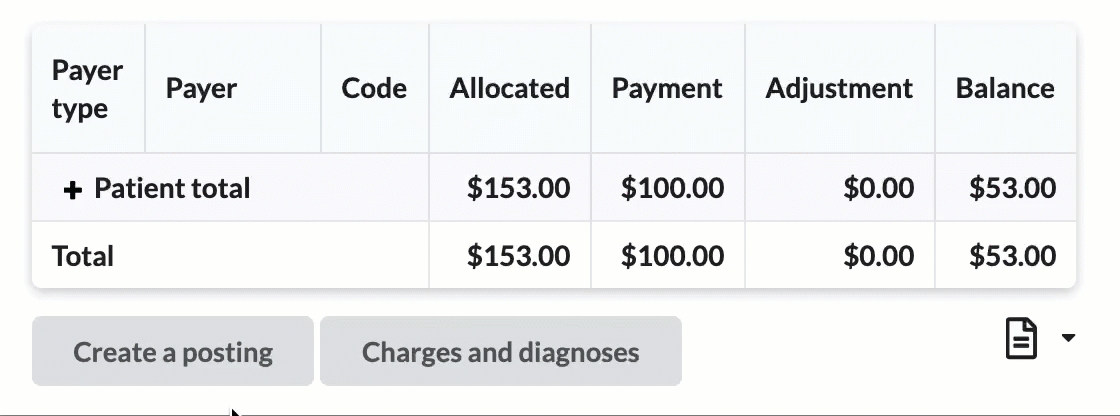
Hover over CPT codes to view original charge amounts.
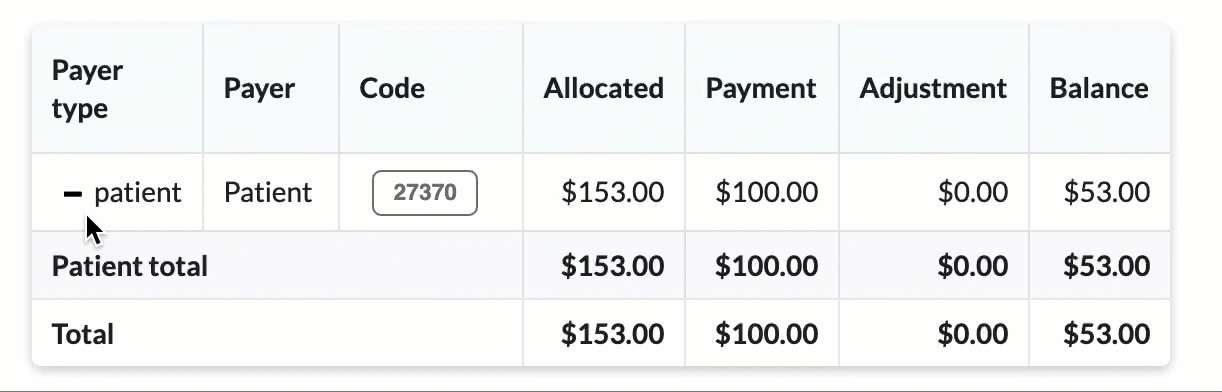
As the claim continues through the claim lifecycle, the ledger is automatically updated with allocated amounts, payments and adjustments.
Charges & Diagnosis
The charges and diagnoses module enables viewing, editing, adding, and removing charges and diagnoses from the claim.
Selecting either the Charges or Diagnosis button will open the same modal, defaulted to the view that was selected.

Modifying a Claim
Changes made on the claim in the charges & diagnosis modal will only impact the claim; changes will not be made to the note.
Adding a CPT Code to a Claim
Use the Add a Charge tab to input CPT codes, designate charges, and include essential details like date of service, units, and place of service
EPSDT or FP codes with * are clearinghouse-compatible, while non-compatible codes will only appear on HCFA forms.
Note: If a CPT code fails to save to the claim, verify that the CPT code's short name field in the fee schedule does not exceed 255 characters. Shorten the name in the fee schedule if necessary, then retry adding the code to the claim.
View + Modify a CPT Code: Use the Charges tab to view existing CPT codes and linked diagnoses.
To modify, hover over the right side of a line item and select Edit charge details.

Make changes to any field and select Update to once the changes are complete
To remove a CPT code from the claim, click the Remove button to the right of the CPT code.
If a CPT code need a diagnosis code linked or unlinked to the code, click the link icon in the Diagnosis field

If a CPT code is deleted from the claim using the Charges modal, and the note is then unlocked and relocked, the removed CPT code will not automatically reattach to the claim. Additionally, an error message will be recorded in the claim activity log. To reapply the CPT code, users must manually remove and re-add it from the billing footer.
View + Modify + Update Diagnosis Codes: Select the Diagnoses tab to reorder existing ICD-10 codes, add new or remove.
To make changes click the pencil icon on the right
To add a new diagnosis code, add the new ICD-10 to the empty field and click Add Diagnosis
To update an existing diagnosis, click into the box with the necessary code and type the new entry
To change the order of the diagnosis codes, click the number to the left of the diagnosis to open the dropdown and pick the new order
To remove a diagnosis code, click the Remove button
Once changes are complete, select Update. Clicking outside the box will lose all modifications.

Documents
Each claim has related documents including statements, receipts and remittances that can be viewed by selecting the paper icon under the claim ledger

Document Menu
Receipts are generated for any patient payment activity, such as co-pays or balance payments.
Click the document 📄 icon and select Receipts from the dropdown.
The receipts modal will open with the patient's payment history
Click the blue PDF button on the needed receipt
The print preview will open to either print the document or save as a PDF.
Statements can be generated adhoc from the documents menu. A defined outline of this process is found under Invoicing and Statements.
Remittances are attached during automatic ERA processing or when an ERA is posted using Post a Remit.
Click the document 📄 icon and select Remittance from the dropdown.
The remittance modal will open with a list or remittances made on the claim.
Click the blue PDF button to review the remittance document
Superbill Document
A superbill is a critical document summarizing services rendered, diagnoses, and provider details for patient-facing billing or payer submission. It serves as a basis for reimbursement, especially for out-of-network billing.
Ensure that all necessary CPT codes and ICD-10 diagnoses are correctly entered in the note or claim.
From the triple dot menu of the claim header, click Print superbill
Superbills include the following components
Patient Information: Name, DOB, and contact details.
Provider Information: Name, NPI, and practice details.
Date of Service: The date when the services were rendered.
Services Rendered: CPT codes and descriptions of the services provided.
Diagnoses: ICD-10 codes linked to the services.
Total Charges: Total amount billed for the services.
Practice Information: Address, contact information, and tax ID for billing inquiries.
HCFA/CMS 1500
The HCFA form is also known as a CMS 1500. The form allows medical physicians to submit health insurance claims for reimbursement from various government insurance plans including Medicare, Medicaid and Tricare.
Click the triple dot menu of the patient's coverage.
Select Print HCFA and choose whether to print with No background or with Claim form background.
The print window open with a preview of the document. From here, the document can either be printed or saved as a PDF.

Visit Note
From the claim, it is possible to print the corresponding visit note.
Click the triple dot menu of the note header
Click Print note
The print window will open with a preview of the note. Complete by printing or saving as PDF
Coverages
The Coverages section of a claim provides a clear and actionable overview of patient insurance details and their relation to the claim. It includes tools for managing coverages effectively to ensure smooth claims processing and payment allocation.
Coverages will display on claims if the start date is on or before the date of service
Show available coverage appears if additional active coverages exist but are not linked to the claim
If a new coverage is added to the patient profile after the creation of the claim or completion of its associated note, it must be manually linked to the claim.

Components of Claim Coverage
Each claim coverage displays the following information for all active coverages shown:
Identify Active Coverage: Active coverage is highlighted in yellow and updates automatically as the claim progresses (e.g., when submitted to a secondary payer).
Rank of Insurance: The order in which insurance payers are billed (e.g., primary, secondary, tertiary).
Click the triple line menu to the left of the coverage to change coverage positions
The coverage position can also be changed under the Coverage heading of the patient profile.
Insurance Plan Details: The insurance plan name, type, and associated payer ID.
Policy Number: The policy ID for the linked coverage.
Patient’s Eligibility Status: Confirms whether the patient is eligible under the listed coverage.
✅: Insurance is eligible
⚠: Error occurred running eligibility and requires further review
❌: Insurance is not eligible
Submission Status: Indicates whether the claim is submitted electronically or via paper.
Coverage Menu
Within the triple dot of each coverage, multiple actions can be managed
Edit Coverage Details: Update plan details, subscriber information, or resubmission codes.
View Insurance Card: Displays coverages card image, if applicable
Remove Coverage: Selected coverage is removed from the claim
Transfer Balance: Users can transfer balances to or from a coverage by using Transfer Balance.

Data Table
The claim data table includes easily referenced data including:
Claim ID: This is sent to ClaimMD to link back to the patient when the ERA is received
Provider NPI: NPI of provider assigned to the visit
Guarantor: Person responsible for paying the patient balance
Labels: Claim specific labels which can be created by following this process.

Activity Log
The Activity Log provides a chronological record of all actions related to a claim, offering transparency and aiding in troubleshooting.
Access the log to view a detailed history of claim actions, including time-stamped entries and associated users.
When the author is Canvas Bot, update came in programmatically such as an ERA or a protocol that is in place
Some activity log items are collapsed by default, select
see more..to expand and see additional details
Use the Post a Comment feature to document decisions or provide context. Comments include the author’s name and timestamp.
Clicking the table headings will filter the log to its specifications

Snooze a Claim
Allows users to temporarily hide a claim from the primary outstanding claims queue. This functionality is particularly useful for managing claims that require delayed follow-up or additional information before action can be taken.
Snoozing a claim sets a filter on the queue that temporarily removes the claim from the active view for a specified period.
Locate the Snooze option in the claim header.
Select the desired snooze duration
Preset timeframes: 3 days, 1 week, etc
Custom date: 1/28/2026
Confirm the snooze action to hide the claim from the default queue view.
Once the snooze period ends, the claim automatically reappears in the queue for follow-up.

Claim Data
Now that we know how a claim is structured, lets review where data on the claim originates. Each claim has an associated note which has a patient, staff and practice location. This information populates the associated claim.
Patient Information
Patient demographics and coverage information originates from the patient chart and profile. When the associated note is locked, the claim is updated with any current patient demographic or coverage information at that time
Patient data required for successful claim processing includes:
Name / DOB
Address
Phone
Sex at Birth
Coverage data required for successful claim processing includes:
Coverage Name (linked to the payer ID)
Policy Number
Start Date
Coverage Address
Coverage Phone
Relationship to subscriber
Subscriber Information
If the subscriber is not the patient, the subscriber will also have a Canvas chart that requires the same patient data as above.
Staff Information
When a provider is added into Canvas their staff profile must be populated with essential information to accurately populate a claim. Required information includes:
Name
NPI
Group NPI
Address and Phone - marked as
use = workTax ID
Medical License
Taxonomy Number (if applicable)
CLIA Number (if applicable)
Modify a Claim
Claims are populated with the information reviewed above from the note, staff, and organization/practice locations. However at times, changes will need to be made to a claim. Within the triple dot of the note header or the triple dot of the coverage details, users can modify the populated information to support the needs of the individual claim

Edit Claim Details
Select Edit Claim Details to update any accident-related information:
Motor Vehicle Accidents: Specify the state and date of injury.
Employment-Related Injuries: Record the date of injury.
Other Accidents: Select an Accident Code and date of injury.
Once you've made the changes, click Update to save.
By default, claims are categorized as "not accident or employment-related," so adjustments are required if this information applies.
Edit Patient Details
In the patient details form, the following fields can be updated:
Patient's First, Middle, and Last Name
Date of Birth (DOB)
Sex
Social Security Number (SSN)
Phone Number
Address
Edit Provider Details
In the provider details form, the following items can be modified:
Rendering Provider
Billing Provider
Referring Provider
Supervising Provider
Facility Information
To bill the claim incident-to, set a Supervising Provider and turn on the Incident-to toggle. The supervising provider can be selected from staff or entered as free text. When Incident-to is on, the supervising provider is submitted as the rendering provider on the claim's outputs (CMS-1500, 837P, and Candid); the documenting provider stays on the note.
The supervising provider is carried over from the note when the claim is created, and is captured (snapshotted) on the claim at that time — so later changes to the note or the provider's staff record won't alter a claim that's already been created.
After completing the changes, select Update to save.
Use the + and – buttons next to Referring Provider and Facility Information to expand or collapse these sections as needed.
Edit Coverage Details
Choose Edit Details on the coverage triple dot to modify the following sections:
Coverage Details: Update information such as Plan, Group, Policy Number, Employer, Type Code, and Address.
Subscriber Details: Modify Name, Sex, Date of Birth (DOB), Phone Number, and Address.
Resubmission Code Details: Adjust Resubmission Code, Payer ICN, and set whether to display a corrected claim on the HCFA header.
Once all desired changes are made, select Update to save.
Claim Checks
Canvas performs basic claim checks every time a claim is loaded. Claim checks help to ensure the claim is ready for submission to the clearinghouse.
Issue | Description | Solution |
Patient Coverage Active | This coverage listed on this claim is not active for this date of service. | Investigate the patient's inactive coverage or update the coverage for this claim to one of the patient's active coverages. |
Billing Provider Tax ID | This claim has no Billing Provider Tax ID. | Update the provider details to add a Billing Provider Tax ID. |
Provider Tax ID | This claim has no Rendering Provider Tax ID. | Update the provider details to add a Billing Provider Tax ID. |
Billing Provider NPI | This claim has no Billing Provider Group NPI number. | Update the provider details to add a Billing Provider Group NPI number. |
Provider NPI | This claim has no Rendering Provider NPI. | Update the provider details to add a Rendering Provider NPI number. |
Hospital Dates | This claim has a charge with Place of Service 21 (Hospital Inpatient) and requires a Hospital Admit and Discharge Date. | Update the Hospital Admit and Discharge Dates, or update the Place of Service for the following charges if appropriate. |
Patient Address | Patient address is missing or incomplete. | Update the patient details to add a patient address. |
Patient DOB | The patient's date of birth is missing. | Update the patient details to add the patient’s date of birth. |
Workers Comp Auto SSN Missing | This Workers Comp / Auto claim is missing the patient’s 9-digit SSN. | Update the patient details to add the patient’s SSN, or change the payer if this should not be a Workers Comp / Auto claim. |
Coverage ID | This claim is missing a coverage policy ID#. | Update the coverage details to add a policy ID#. |
Missing Subscriber Address | This claim is missing the required subscriber address information. | Update the coverage details to either add the address information for the subscriber or update the subscriber to “Self” if the patient is the subscriber. |
No Line Items | This claim has no service charges. | Add the appropriate service charges to the claim. |
CLIA number | This claim is billed with lab charges but is missing a CLIA#. | Update the provider details to add a CLIA# to the claim, or remove the lab charges if appropriate. |
Claim Charge Amount | This claim has service charges, but the total billed amount is $0. | Update the billed amount on the existing service charge(s), or add a service charge with a billed amount. |
Missing Diagnosis Code | This claim has no diagnosis codes. | Add at least one diagnosis code to the claim and link the appropriate charges to it. |
Exceeds 4 diagnosis codes | This claim has procedure codes with more than four diagnosis pointers. The clearinghouse will only submit the first four tied to each procedure. | Assign only four diagnosis codes to the procedure code. If the correct ones aren’t linked, the claim might not explain the service properly, which can lead to rejections or payment issues. |
Charge Diagnosis Pointer | The following charges are missing a diagnosis pointer. | Add at least one diagnosis code to the claim and link the appropriate charges to it. |
Primary Diagnosis of External Cause Code | This claim has an external cause code as the primary diagnosis. | Reorder the ranking of the diagnosis codes to ensure that the external cause code is not primary. |
Duplicate Diagnosis Code | This claim has duplicate diagnosis codes. | Remove the duplicate diagnosis codes. |
Line Item Units | The following service charges have units < 1. | Update the units to a positive number, or remove the service charge if appropriate. |
NDC Codes | This claim is missing the NDC Dosage and/or NDC Measure on the following service charges that are billed with an NDC Code. | Update the service charge with the appropriate NDC Dosage and/or Measure, or remove the NDC Code from the service charge if appropriate. |
Incident-to Supervising Provider Required | This claim is marked incident-to but has no supervising provider with an NPI. | Please add a supervising provider with a valid NPI to the claim, or turn off the incident-to setting. |
Incident-to Supervising Provider Matches Rendering | This claim is marked incident-to, but the supervising provider is the same as the rendering provider. | Please set the supervising provider to the physician supervising the rendering provider, or turn off the incident-to setting. |
Incident-to Place of Service | This claim is marked incident-to but the place of service is not office (11). Incident-to billing is generally not valid in facility settings (42 CFR 410.26). | Confirm the place of service is correct, or turn off the incident-to setting if it does not apply. |
Incident-to Payer | This claim is marked incident-to but the payer is not Medicare. Incident-to rules are a Medicare policy and coverage varies by commercial payer. | Confirm the payer accepts incident-to billing, or turn off the incident-to setting if it does not apply. |
Issue | What it Means | Why it Matters | How to Fix It |
Incident-to Supervising Provider Required | The claim is set to bill incident-to, but it has no supervising provider with an NPI. | Incident-to claims can't be submitted without a supervising provider that has a valid NPI. | Add a supervising provider with a valid NPI to the claim, or turn off the incident-to setting. |
Incident-to Supervising Provider Matches Rendering | The claim is set to bill incident-to, but the supervising provider is the same as the rendering provider. | Incident-to requires the supervising provider to be the physician supervising the rendering provider — not the rendering provider themselves. | Set the supervising provider to the physician supervising the rendering provider, or turn off the incident-to setting. |
Incident-to Place of Service | The claim is set to bill incident-to, but the place of service is not office (11). | Incident-to billing is generally not valid in facility settings (42 CFR 410.26), so the claim may be denied. | Confirm the place of service is correct, or turn off the incident-to setting if it does not apply. |
Incident-to Payer | The claim is set to bill incident-to, but the payer is not Medicare. | Incident-to rules are a Medicare policy and coverage varies by commercial payer. | Confirm the payer accepts incident-to billing, or turn off the incident-to setting if it does not apply. |
Verify the patient’s active coverage and update the claim accordingly. | |||
Update the provider’s information to include a valid Billing Provider Tax ID. This will need to be | |||
Add the Rendering Provider's Tax ID in the provider details. | |||
Add the Group NPI number to the Billing Provider’s information. | |||
Add the Rendering Provider’s NPI in the provider details. | |||
Add admit and discharge dates, or change the POS if incorrect. | |||
Add a complete address to the patient’s profile. | |||
Add the patient’s date of birth in their profile. | |||
Add the SSN or change the payer if it’s not a Workers Comp/Auto claim. | |||
Add the policy ID# to the coverage details. | |||
Add the subscriber’s address or update the subscriber to 'Self' if applicable. | |||
Add appropriate service charges to the claim. | |||
Add a valid CLIA# or remove the lab charges if not applicable. | |||
Enter a proper billed amount for each service charge. | |||
Add at least one relevant diagnosis code and link it to the charges. | |||
Limit each procedure to four diagnoses or split the charge across multiple lines. | |||
Ensure each charge points to at least one appropriate diagnosis. | |||
Reorder the diagnoses so a valid clinical diagnosis is primary. | |||
Remove any duplicated diagnosis codes. | |||
Correct units to a positive number or remove invalid charges. | |||
Add missing NDC dosage/measure info or remove the NDC code if not needed. |
Claim Processing
Submitting a Claim
Move the claim to the Submission Queue.
Claims in the submission queue are submitted to Claim.MD either:
Automatically via a scheduled daily process (setting will need to be configured for this process)
Manually by selecting Batch Actions and submitting to the clearinghouse.

If the clearinghouse rejects the claim immediately:
The claim will move to the Rejected Queue.
An explanation for the rejection will appear in the Activity Log for review and correction.

Claims can be automatically submitted to ClaimMD each night by setting nightlyERASubmission under Settings > Organizations to true.
When a claim is billed incident-to:
- CMS-1500 (paper): Box 24J shows the supervising provider's NPI. On non-incident-to claims that have a supervising provider (and no referring/ordering provider), Box 17 shows the supervising provider.
- 837P (electronic): the supervising provider rides each charge and is submitted as the rendering provider.
- Candid: the supervising provider is included on the encounter.
Claim Review Records (CRR Claims)
CRR claims are used when a provider associates more than 12 diagnosis codes with an encounter. The professional 1500 claim format supports only up to 12 diagnosis codes.
Split claims can be reviewed within the charges modal of the claim, where diagnosis codes are grouped and associated with their respective CPT codes.
Group diagnosis codes and associate them with corresponding CPT codes in the Charges Modal.
Link ICD-10 Codes to CPT Codes: Each diagnosis code must tie to at least one CPT code to avoid errors.
Validate Diagnosis Codes: Before locking the provider note, ensure all diagnoses are linked correctly in the billing footer.
Avoid Duplicates: Do not reuse diagnosis codes across primary and CRR claims, as this may result in denials.
Submit the CRR claim once it has been thoroughly reviewed. Confirm all diagnoses are appropriately ranked and linked to CPT codes to prevent processing errors.

Automated ERA Processing
ERAs (Electronic Remittance Advice) from ClaimMD are processed in Canvas, which includes preset adjustment groups and customizable Posting Rules for specific workflows.
After submission, claims stay in the Filed queue until adjudicated. Once processed, they move to the appropriate queue based on the outcome.
Handling Payer ID Mismatches During ERA Processing
When ERAs are received from a different payer than what appears on the claim (common with out-of-state routing), Canvas may skip processing with the message: "Skipped claim processing for #EFT [number] from [payer]: coverage with remit payer id not found in claim."
Resolution Steps
Configure Alternate Payer Acceptance: Navigate to Settings > Insurers and select the original insurer on the claim. Update the Accept remittances from field to include the payer sending the remittance. This allows the original coverage to accept payments from the alternate payer.
Update Patient Coverage (if needed): If the coverage name needs to change, expire the current coverage and create a new one with the correct insurer name. Simply changing the name on existing coverage will not take effect.
Reprocess the ERA: Go to Settings > ERA process jobs. Click Process ERA in the upper right. Enter the check number from the remittance and click Send. This will reprocess the ERA and apply the payment to the claim.
Note: This process is particularly common with Blue Cross Blue Shield plans that route out-of-state claims to the appropriate regional plan for processing.
When to Use This Process
ERA processing fails due to payer ID mismatches
Claims are routed through different regional payers
Out-of-state insurance plans process claims through local affiliates
The remittance shows a different payer name than the original claim coverage
By default, Contractual Obligation (CO) adjustments go to the ADJUDICATED queue as write-offs. Custom Posting Rules can override this behavior for specific adjustment codes.
Payments and adjustments follow defined Posting Rules; if none apply, the claim moves to ADJUDICATED for manual review.
HISTORY: No balance remains for any coverage.
SUBMISSION: A balance remains for secondary coverage. As long as remit code 19 is not listed, the claim is forwarded to the secondary insurer.
PATIENT: Only a patient balance remains.
ADJUDICATED: Adjustments flagged for manual review.
REJECTED: Claim rejected by the insurer.
Contact Canvas Support to disable automated ERAs.This modification will require manual processing of these entries.
Resubmitting a Claim
Resubmitting corrected claims ensures accurate reimbursement. To resubmit:
Make necessary corrections to the existing claim.
Click the triple dot menu on the coverage
Select Edit Claim Details

Choose an appropriate Resubmission Code, such as:
Corrected Claim
Replace Submitted Claim
Voided Claim
Enter the payer ICN if available and enable the "CORRECTED CLAIM" header on the CMS 1500 form if required.

Save changes, verify updates in the Activity Log, and move the claim back to the Submission Queue.
Create a Posting
When handling claim adjustments and payments, there are times when a posting must be created manually to reflect specific payment details accurately.
Select a Payer: Choose from the dropdown and add a payment description for clarity, if helpful
Enter Payment Details:
Amount
Payment Method
Cash: Enter the deposit date
Credit Card: Include the cardholder’s name and card number
Checks: Provide the check number, check/EFT date, and deposit date.
Other Methods: Simply add a description to identify the payment source.
Add Adjustments: Select the appropriate Adjustment Type from the dropdown.
Adjustment types are categorized based on posting rules and include behaviors like Write-Offs, Transfers, or Non-Write-Off Adjustments.
Write-Off Adjustments: Use for contractual obligations or payer-initiated reductions.
Transfer Adjustments: Apply for deductible, co-pay, or coinsurance amounts transferred to the next payer.
Non-Write-Off Adjustments: Use for payer-specific reductions that require special handling.
If the adjustment deviates from the predefined posting rules:
Describe the reason for the deviation clearly in the Description field.
This ensures transparency and proper documentation for future reference.
Save and Submit: Once all details are filled in, submit the posting. The payment and adjustment will now reflect in the Claim Ledger and appear in the Activity Log.
To get the Adjustments type dropdown to appear, type into the field.

Correct a Posting
When an existing posting requires adjustments or corrections, the Correct Posting feature allows you to update payment or adjustment details accurately. This ensures the claim ledger remains up to date and reflects accurate balances.
Locate the Posting
Navigate to the claim's Ledger section.
Expand the relevant posting by selecting See More next to the entry.
Select the Correction Option
Click on Make Correction to enter the editing mode
The posting will switch to an editable table, allowing changes to specific fields such as payment amount, adjustment amount, or payer details.
Edit the Fields
Update the necessary details. Common corrections include:
Modifying the Payment Amount: Adjust the payment to reflect the correct amount received.
Changing the Adjustment Amount: Revise incorrect write-offs or transfer amounts.
Updating the Payer Information: Correct errors related to the payer or remittance data.
Validate Changes
After making updates, click Correct Posting to confirm the changes.
This action opens the Summary of Corrections modal.
Review in the Summary of Corrections Modal:
Verify all details before submitting. The modal displays:
Type of Correction: Identifies whether it’s a payment or adjustment update.
Original Amount: Shows the previous value for reference.
New Amount: Displays the updated value entered during the correction.
Amount Corrected By: Highlights the difference between the original and new amounts.
Submit or Reset:
Submit the Correction: If the corrections are accurate, select Create a Posting to finalize the changes.
Reset the Changes: If there are discrepancies, click Reset to discard the edits and revert to the original values.
Confirmation and Activity Log Update:
After submission, the corrected posting is saved and reflected in the claim ledger.
The Activity Log records the correction, including details of the changes, the user who made them, and the time of the update.
Post a Remittance
For claims that are not automatically processed via an Electronic Remittance Advice (ERA), the Post a Remit feature allows users to manually record payments and adjustments. This ensures the claim ledger remains accurate and up to date.
Access the Post a Remit Form:
Navigate to the Revenue section and click the green Post a Remit button to open the Post a Remittance form.
Enter Payment Details
Input essential payment information, including:
Payment Amount: The total amount received from the payer.
Check Number or EFT Number: Unique identifier for the payment.
Insurer/Payer Name: Select the payer responsible for the remittance.
Payment Method: Choose from available options:
Credit Card
Check/EFT
Other
Attach Digital Documents (Optional)
Upload a copy of the remittance advice or related documentation for reference.
This ensures easy retrieval and supports future audits.

Link the Remittance to Claims
Select + Add a Claim to associate the payment with one or more claims.
In the Find a Claim modal:
Search by patient name or Claim ID
Only claims with active coverage linked to the selected insurer will appear.
Review details, including claim ID, date of service, patient name, provider, charges, and current queue status.
If needed, click on the Claim ID to view more details in a new browser tab.
Click Select on the appropriate claim to link it to the remittance.

Allocate Payments and Adjustments
Once the claim has been identified and selected the correct claim, the Record Claim Payments and Adjustments modal will appear.
Enter the payment description (optional).
Specify payment and adjustment amounts.
Select the Adjustment Type (e.g., write-off, transfer, non-write-off).
If a balance remains:
Designate where it should be transferred (e.g., to the patient or secondary payer).
Use the Write-Off checkbox if applicable.
For claims with multiple codes, add or remove adjustment lines as needed.
Choose to either automate the claim’s movement to the appropriate queue or manually set it
Submit the Claim
Prior to submitting, ensure the recorded payments match the total payment amount on the remittance. Click Submit to finalize the remittance, and the claim will be updated accordingly.
Invoicing & Statements
Creating a Statement
Patient statements are vital for collecting outstanding balances and providing clear communication about payments owed. Canvas Medical offers several options for generating and distributing these statements, ensuring flexibility for various practice needs.
Methods for Generating Statements
Manual Batch Processing: Generate statements in bulk, ideal for end-of-cycle processing or managing large batches of outstanding balances.
To create batch statements:
Navigate to the Statements Batch Processing option in the Revenue section.
Select and process all eligible statements based on your criteria.
This method is perfect for periodic billing workflows or addressing multiple accounts simultaneously.
Automated Processing: Send statements via email or physical mail programmatically.
This set up will need to be configured by the practice's admin. See Automated Invoicing below for configuration process.
Patients will need to have a valid email and/or postal address for statements to send successfully.
Ad-Hoc Printing: Allows users to print individual statements directly from a patient's record for streamlined access.
This feature is ideal for urgent or on-demand requirements during patient interactions, such as visits or follow-ups.
Statements can be quickly generated from either the patient profile or the claim section within the system.
Select the document icon 📄 to access the statement options.
Choose Statement from the dropdown menu.
Click Create Statement in the Statement modal to generate and download a new PDF version of the statement.
Setup & Configuration
Configuring Organization and Practice Locations for Billing
Practice locations in Canvas can populate claims with location-specific information or select Bill through organization in the Practice Location setting, which defaults to the information captured on the organization profile. Required information includes:
Full & Short Name
NPI
Tax ID
Address
Phone
If notes require a different name, NPI, taxonomy or address this can be completed on the Practice Location profile
Billing location name
Group NPI number
Taxonomy number
Address / Phone with
use = billing
On the practice location, there is the option to Include ZZ qualifier for taxonomy code when submitting a claim. When checked, the claim will automatically include the ZZ Taxonomy Qualifier.
If updates are made to the Practice Location page after a note is created—such as changes to address, billing name, or "Bill through organization" settings—these must reflect on the claim. The claim can manually be updated, or unlock and re-lock the note to incorporate changes. If the note isn't ready to be locked, use the Push Charges button to update the claim if enabled.
Box 33a and Box 32a
Box 33a and Box 32a serve distinct functions on the CMS 1500 form.
Box 33a is designated for the Billing Provider’s National Provider Identifier (NPI), sourced from the Group NPI on the organization’s configuration page, and is mandatory.
Box 32a is used to input the Service Facility NPI and is only required when it differs from the Billing Provider’s NPI.
If a provider's individual NPI needs to be included in Box 32a, this can be accomplished by creating a new location with the specific details or updating these details in the provider profile.
Review below for CMS 1500 form fields based on billing through practice location or organization.
Form item | Bill Through Organization == True | Bill Through Organization == False |
25 | Organization tax id | Note location tax id |
32 | Note location billing or first address | Note location billing or first address |
32 a | Note location npi_number | Note location npi_number |
33 | Organization billing address or first address | Note location billing address |
33 a | Organization group npi number | Note location group npi number |
33 b | Organization group taxonomy number | Note location taxonomy number |
Creating a Posting Rule
Posting rules help manage adjustment codes to monitor payments and adjustments efficiently. Canvas provides preset adjustment groups, but users can add customized posting rules to suit their workflows.
Regularly updating the posting ruleset can reduce manual work and keep rules relevant.
Adding a Posting Rule
Navigate to the Quality & Revenue: Posting Rules setting
Click the Add Posting Rule +
Complete the fields
Description: How the posting rule will display in Canvas
Adjustment Group: Explains the adjudication of the claim
Contractual Obligation
Other: Adjustment
Payer Initiated Reductions
Payer Responsibility
Collection Write-Off
Courtesy Write-Off
Credit
Transfer
Adjustment Code: Reason a claim or service line was paid differently than it was billed.
To review a list of all common adjustment codes visit X12.org
Individual payers may have specific posting rules as well.
Behavior: Action when posting rule is used
Write off adjustment
Non write off adjustment
Transfer adjustment to next payer
Payer Order: Which payer to apply the posting rule to
Transactor: Specific insurer the posting rule applies to
Automated Action Review: Posting rule will automatically apply to claim when applicable
Updating a Posting Rule
Navigate to the Quality & Revenue: Posting Rules setting
Select posting rule that needs to be updated
Make any necessary changes and save
The following posting rules are created by default in all environments:
Name | Adjustment Group | Adjustment Code | Behavior |
CO-45 | Contractual Obligation | 45 - Charge exceeds maximum allowable or contracted fee arrangement | Write-Off Adjustment |
CO-253 | Contractual Obligation | 253 - Sequestration | Write-Off Adjustment |
CO-144 | Contractual Obligation | 144 - Incentive adjustment | Write-Off Adjustment |
CO-131 | Contractual Obligation | 131 - Claim specific negotiated discount | Write-Off Adjustment |
PR-1 | Patient Responsibility | 1 - Deductible amount | Transfer Adjustment to next payer |
PR-2 | Patient Responsibility | 2 - Coinsurance amount | Transfer Adjustment to next payer |
PR-3 | Patient Responsibility | 3 - Copayment amount | Transfer Adjustment to next payer |
PR-44 | Patient Responsibility | 44 - Prompt pay discount | Write-Off Adjustment |
PI-24 | Payer Initiated Reductions | 24 - Charges are covered under capitation | Write-Off Adjustment |
OA-23 | Other Adjustment | 23 - The impact of prior payer(s) adjudication | Non write off adjustment |
Limits of Posting Rules:
Tasks are generated if a remit states "Claim not found" or "Payer not found."
Claims with new line items require manual review in the Adjudicated Queue.
Configuring Automated Invoicing
Enable Automated Invoicing
Contact Canvas Support to request activation of automated invoicing for the practice.
Configure Initial Delay After Service Date
The delay for sending the first invoice can be customized in the Practice: Organizations settings
Update the patientInvoiceSendDelay configuration with a specific value, such as
{"days": 0}.Default setting: 0 days, which ensures invoices are sent immediately after the service date.
Practices can increase the delay period to allow a grace period before patients receive their first invoice.
Important Callouts
The send delay is based on the date of service, not the date when the balance was transferred to the patient.
Invoices are sent to all patients with an outstanding balance, regardless of the billing queue.

Set Frequency of Sending
Adjust the frequency for reissuing statements by updating the INVOICE_INTERVAL configuration available in Constance: Config.
Defines the interval at which subsequent statements are sent after the initial invoice is dispatched.
Default: 15 days
Modify the interval to reflect the practice’s specific billing cycles and operational preferences.

FAQ
Q: Why was my claim returned to the coding queue?
A: When notes linked to claims are unlocked and then relocked, an automated process moves the claim back to the coding queue. This ensures that any billing changes are accurately reflected on the claim.
Q: Where do I find a remittance document?
A: The remittance document is accessible in the document icon below the claim ledger and in the posting itself.
Q: What should I do if a claim is listed twice in a remittance?
A: If a claim appears more than once in a remittance, no transactions will be recorded for the duplicate entry, and the Canvas Bot will add the following comment: “Skipped processing duplicate account number in remit.”
Q: What happens if I accidentally manually post an ERA?
A: You can manually post an ERA as many times as you'd like, but Canvas will not create duplicate postings on the claim.
Q: Why is a claim in my adjudicated queue?
A: All claims that have an adjustment code that is part of a ruleset where automated action review is checked will display in the adjudicated queue for manual completion.