Enrolling in EPCS with DrFirst: Step-by-Step Guide for Providers
Last updated: September 28, 2026
This guide walks you through enrolling in Electronic Prescribing of Controlled Substances (EPCS) with DrFirst as a provider on Canvas. When you finish, your practice's EPCS administrator will activate your access with you using your passphrase and token.
Prefer to click through the screens? Use the arrows in the walkthrough below to step through each screen, then use the steps further down for the details.
Having trouble opening the slides above? Use the direct link here.
Before you start
Put aside a half hour to complete the session: The ID photo step has to be done within an hour, and your token has to be added within 24 hours of starting.
Find your invite email from
epcs-do-not-reply@drfirst.com.Gather the following items: your phone, your driver's license, state ID, or passport, NPI and your Social Security number, and a credit card (it won't be charged).
Install the VIP Access app (by Symantec/Broadcom) from the App Store or Google Play. It generates the 6-digit codes you'll use to sign controlled-substance prescriptions.
iPhone: VIP Access for iPhone
Android: VIP Access
Step 1: Open your email invite
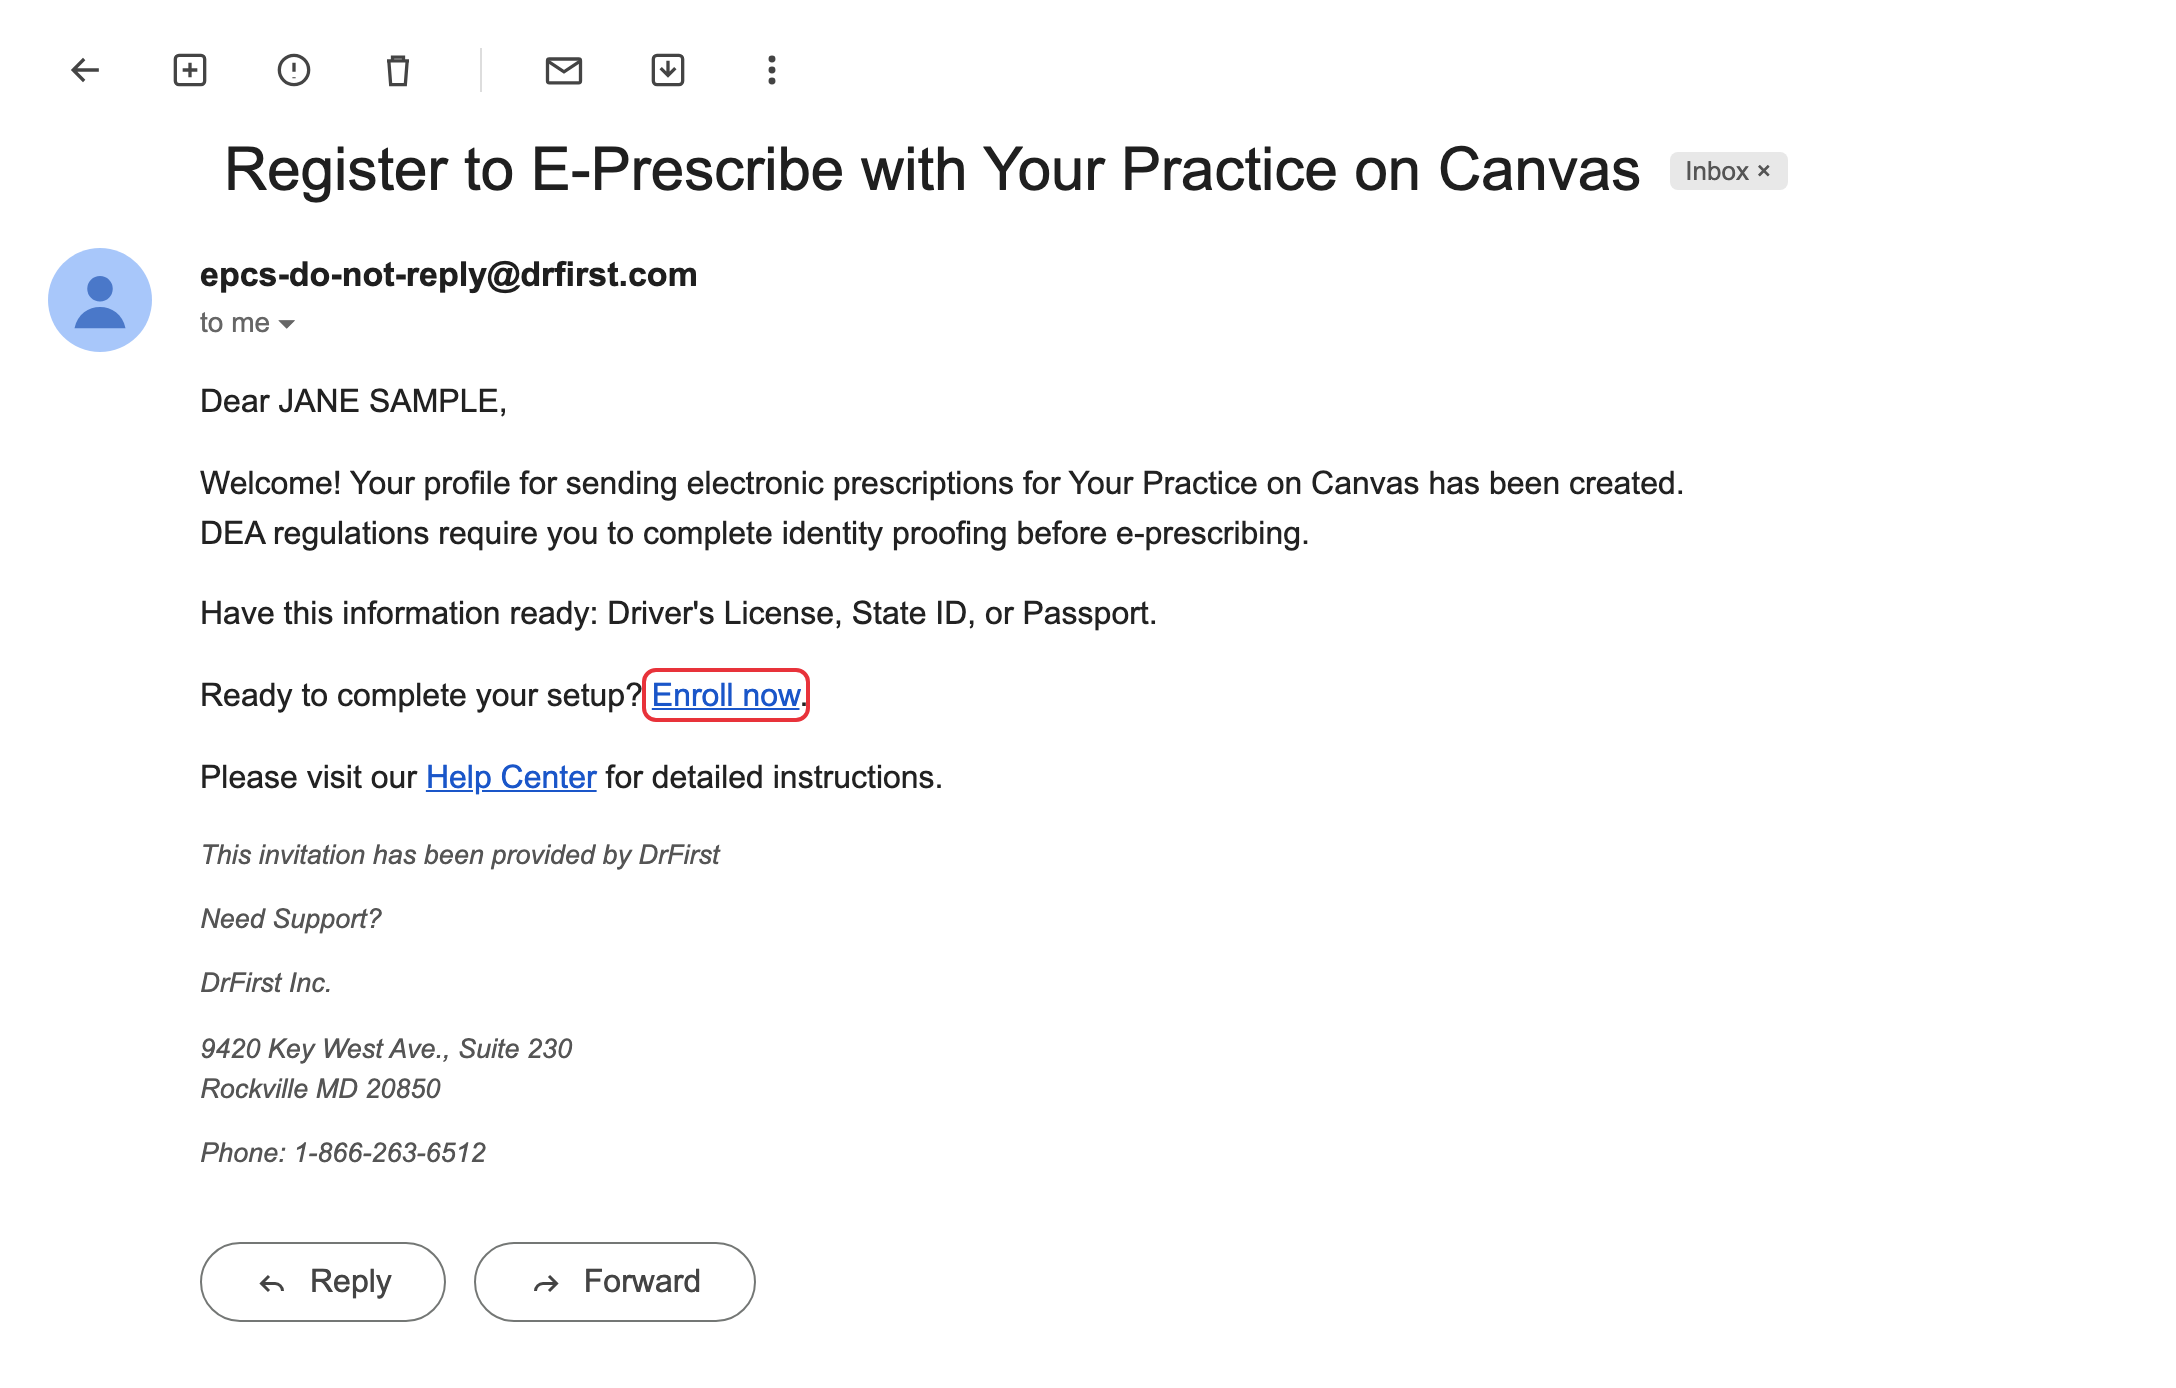
Open the DrFirst invite email from epcs-do-not-reply@drfirst.com and click Enroll now.
Step 2: Enter your invite details
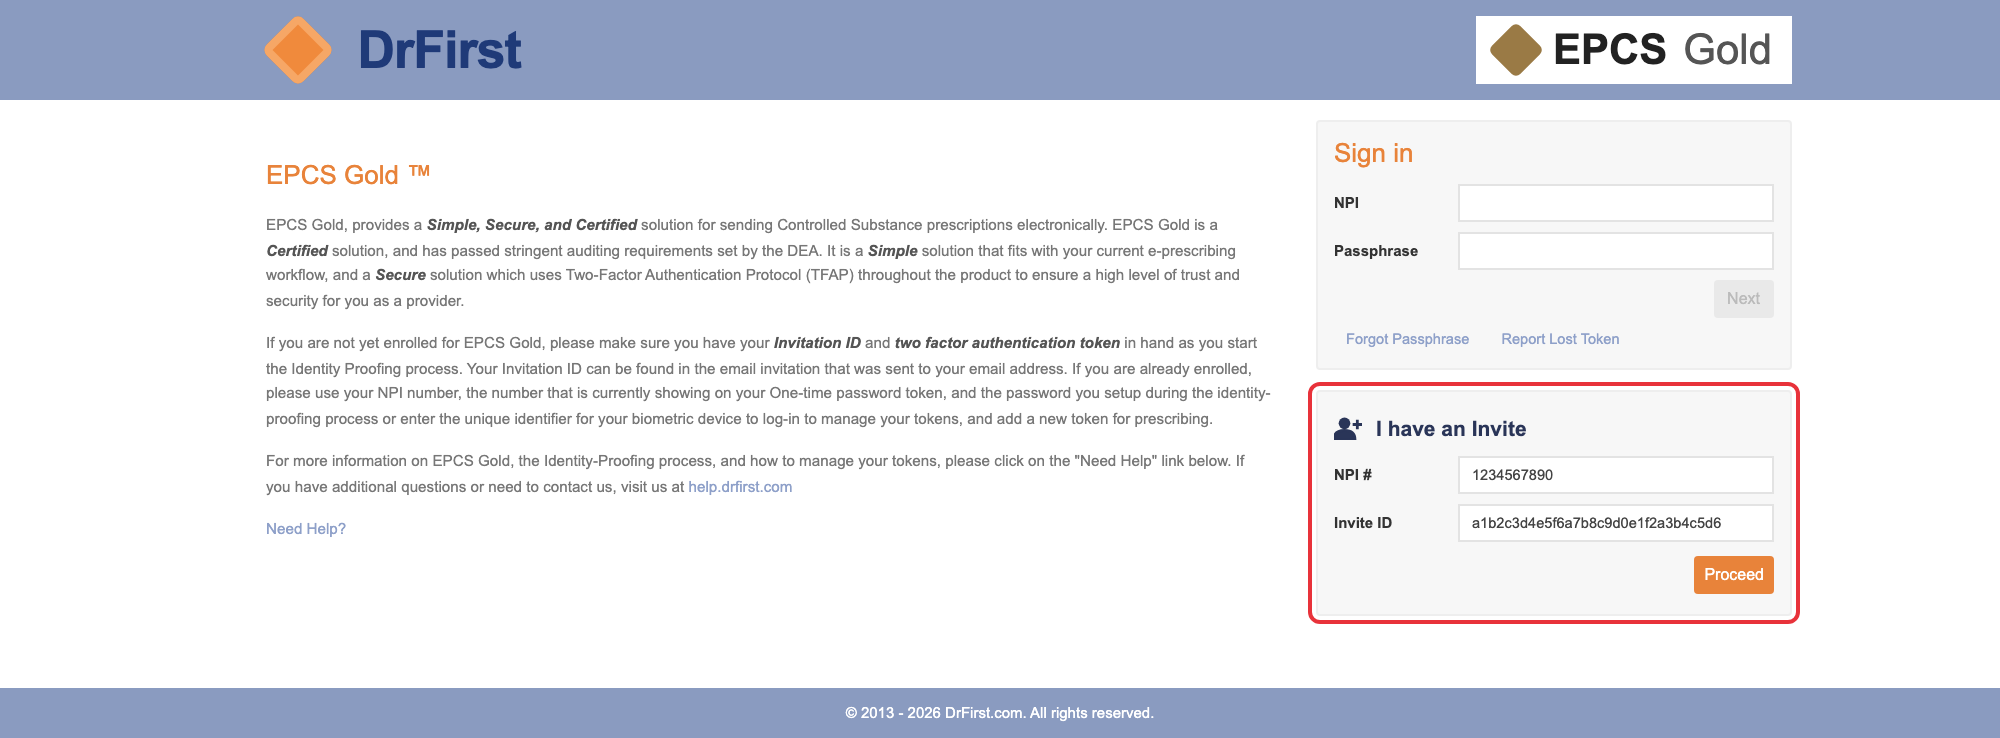
On the DrFirst page, locate the "I have an Invite" section on the right.
Check that your NPI and Invite ID are already filled in. Clicking Enroll now in the email fills them in for you.
Click Proceed.
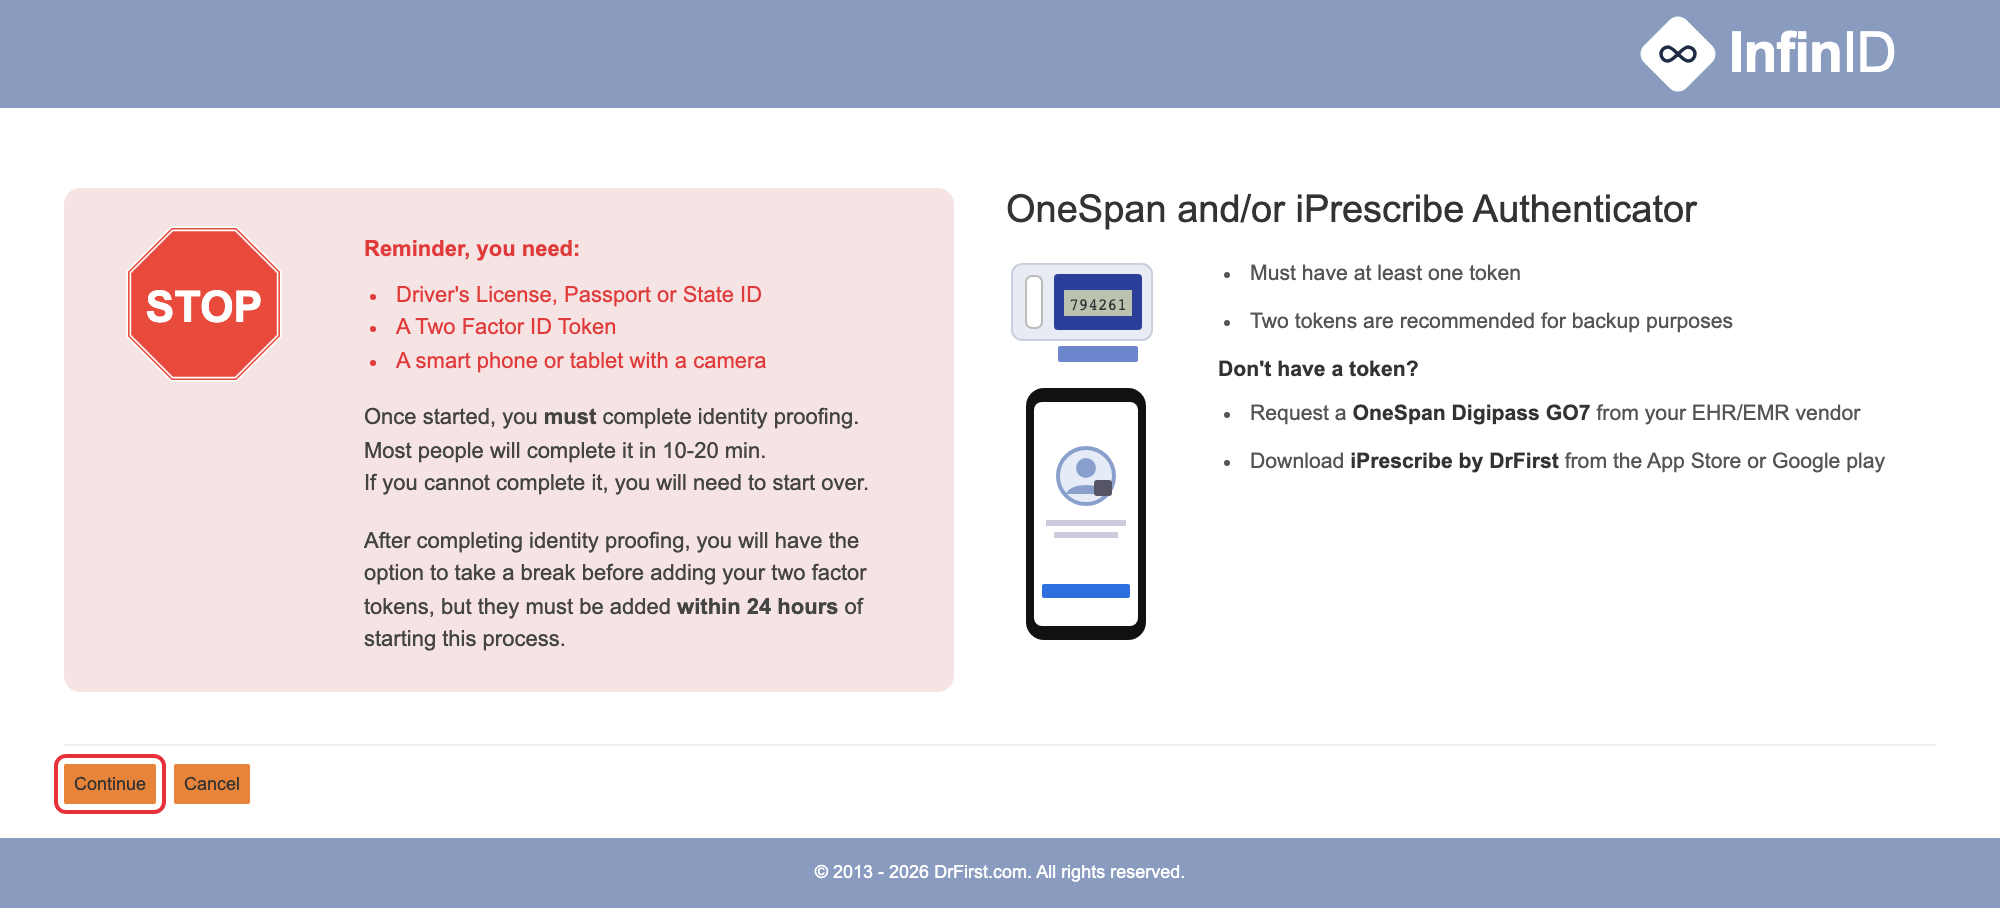
Step 3: Review the reminder of what you need and click "Continue"
IMPORTANT This screen suggests OneSpan or iPrescribe - you don't need either one. Canvas uses the VIP Access app instead which is available for free.
Step 4: Complete identity proofing
If you've done DrFirst identity proofing before, at any practice, DrFirst will ask how you if you want to use your existing credentials or complete the identity proofing process again.
Click Complete the identity proofing process again, even if you've used DrFirst or iPrescribe somewhere else.
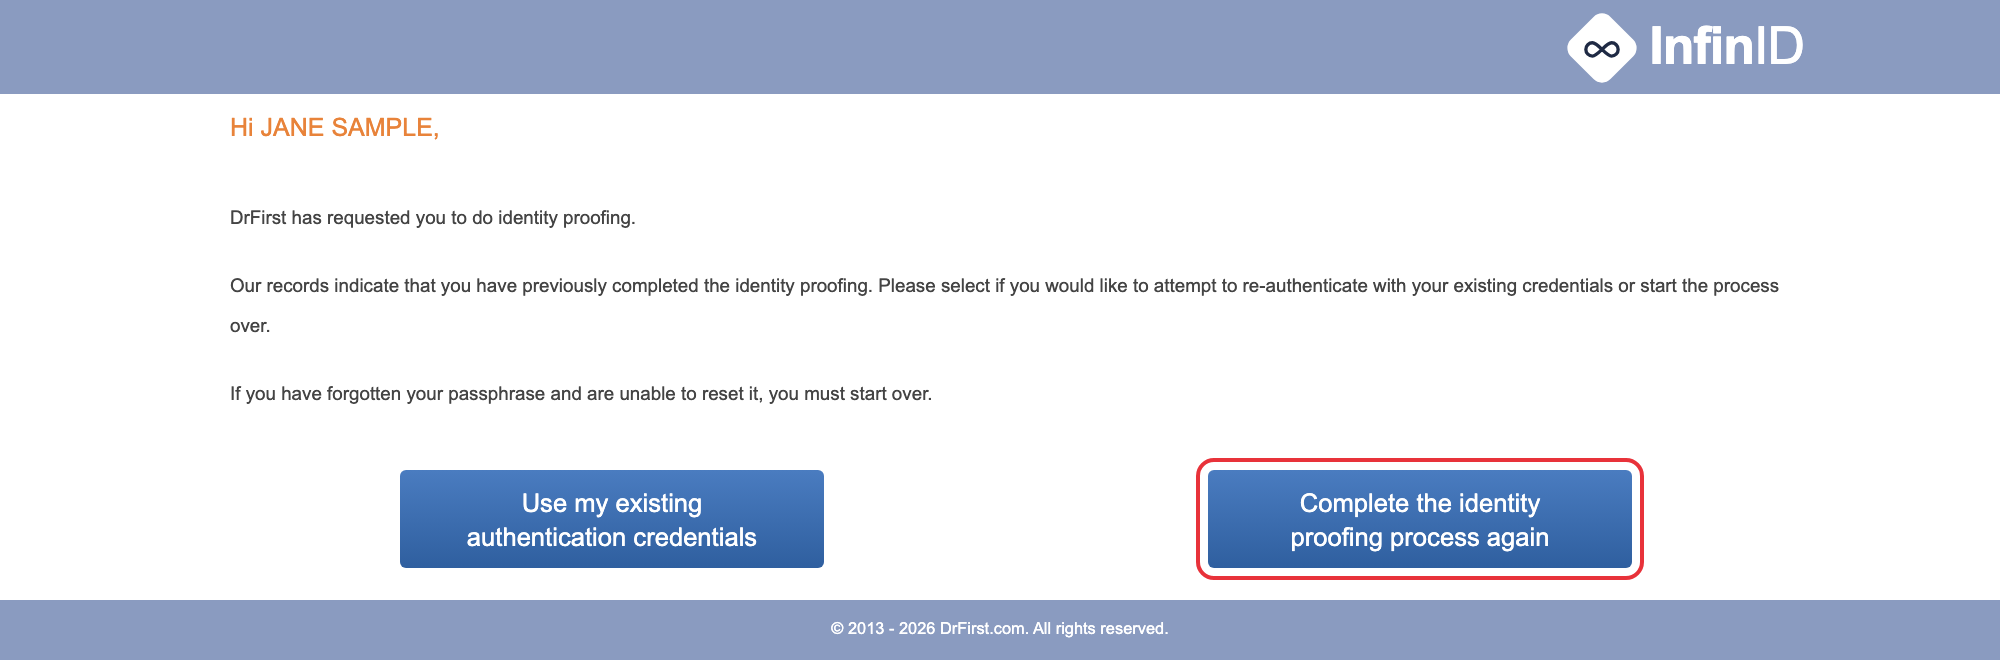
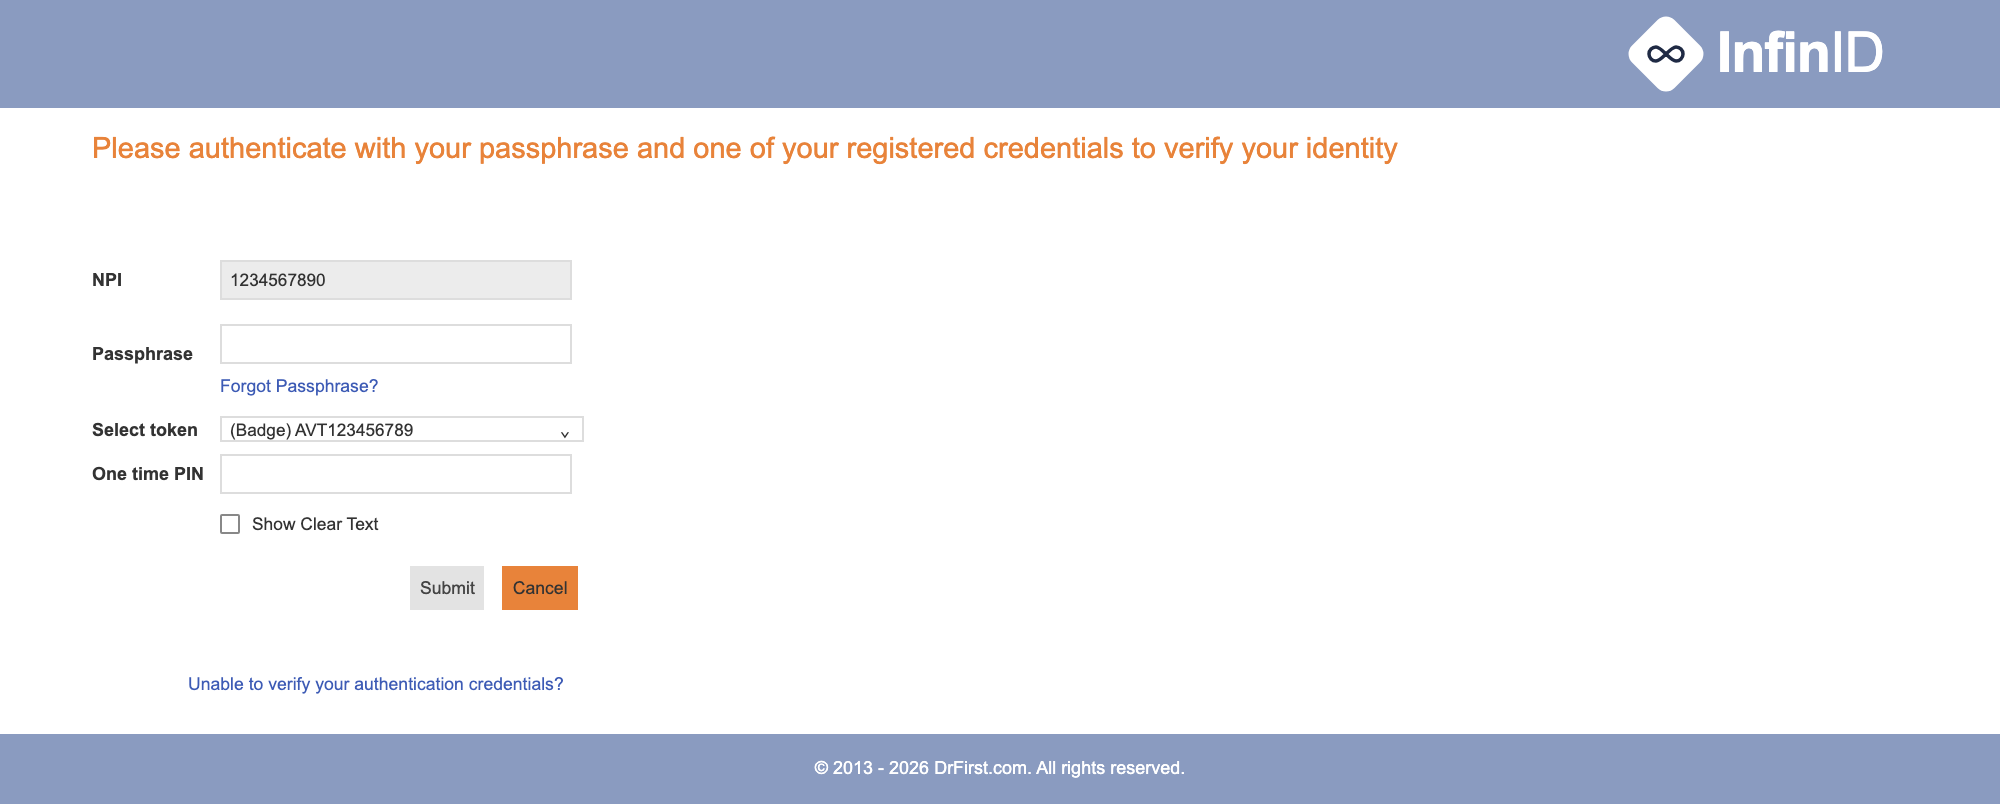
If you click Use my existing authentication credentials by mistake, you'll land on the screen below asking for your passphrase and a token. Click Cancel or your browser's back button, and choose Complete the identity proofing process again instead.
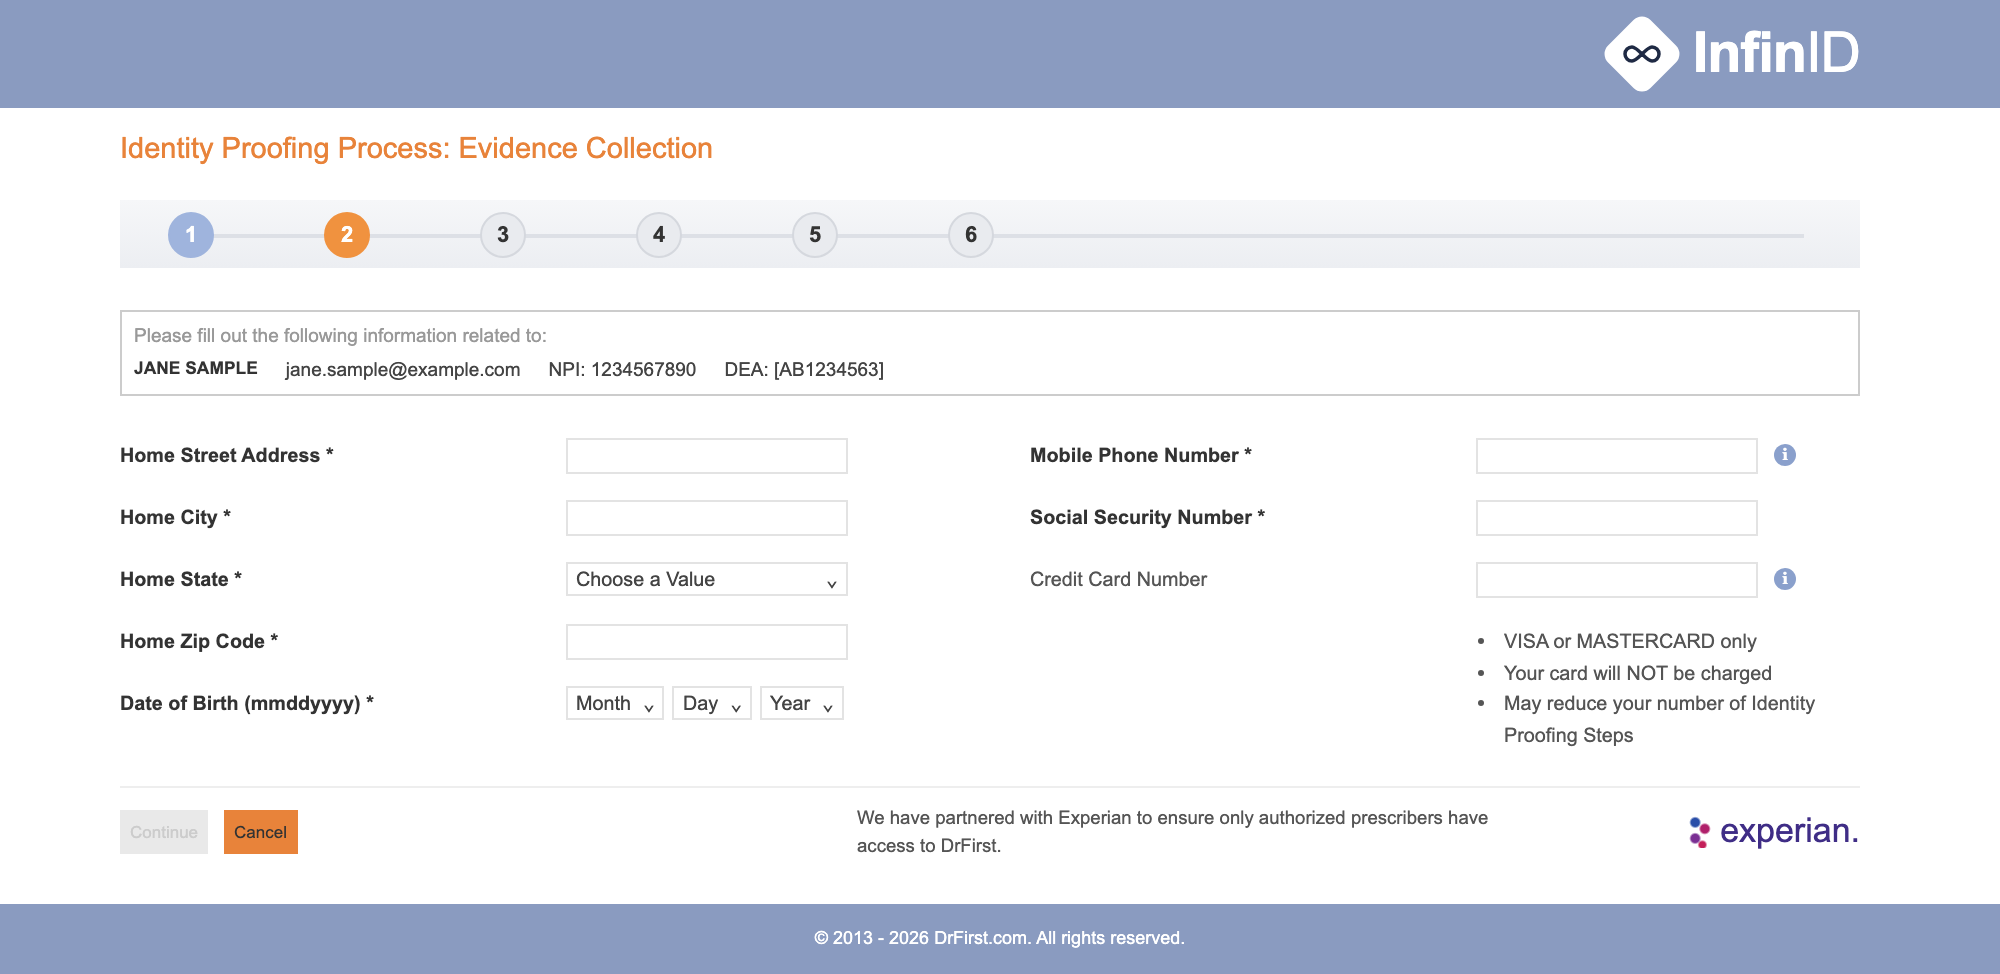
Step 5: Identity Proofing Process: Evidence Collection
DrFirst uses Experian to confirm who you are. Your details need to match your credit report exactly.
Fill in your home address, date of birth, mobile phone number, and Social Security number. Use your personal mobile number, not your office line.
Leave periods and special characters out of your address (for example, "1 E Main St Apt 204" instead of "1 E. Main St. Apt. #204").
Enter a Visa or Mastercard credit card number, it will not be charged.
Click Continue. If Experian can't match you right away, it asks 3 to 5 questions based on your credit history.
Tips for capturing your ID
Use your phone or tablet camera
Center your ID on a darker background
If the image won't focus, try moving your device closer or farther from your ID
Allow camera access when prompted
Step 6: Verify your ID on your phone
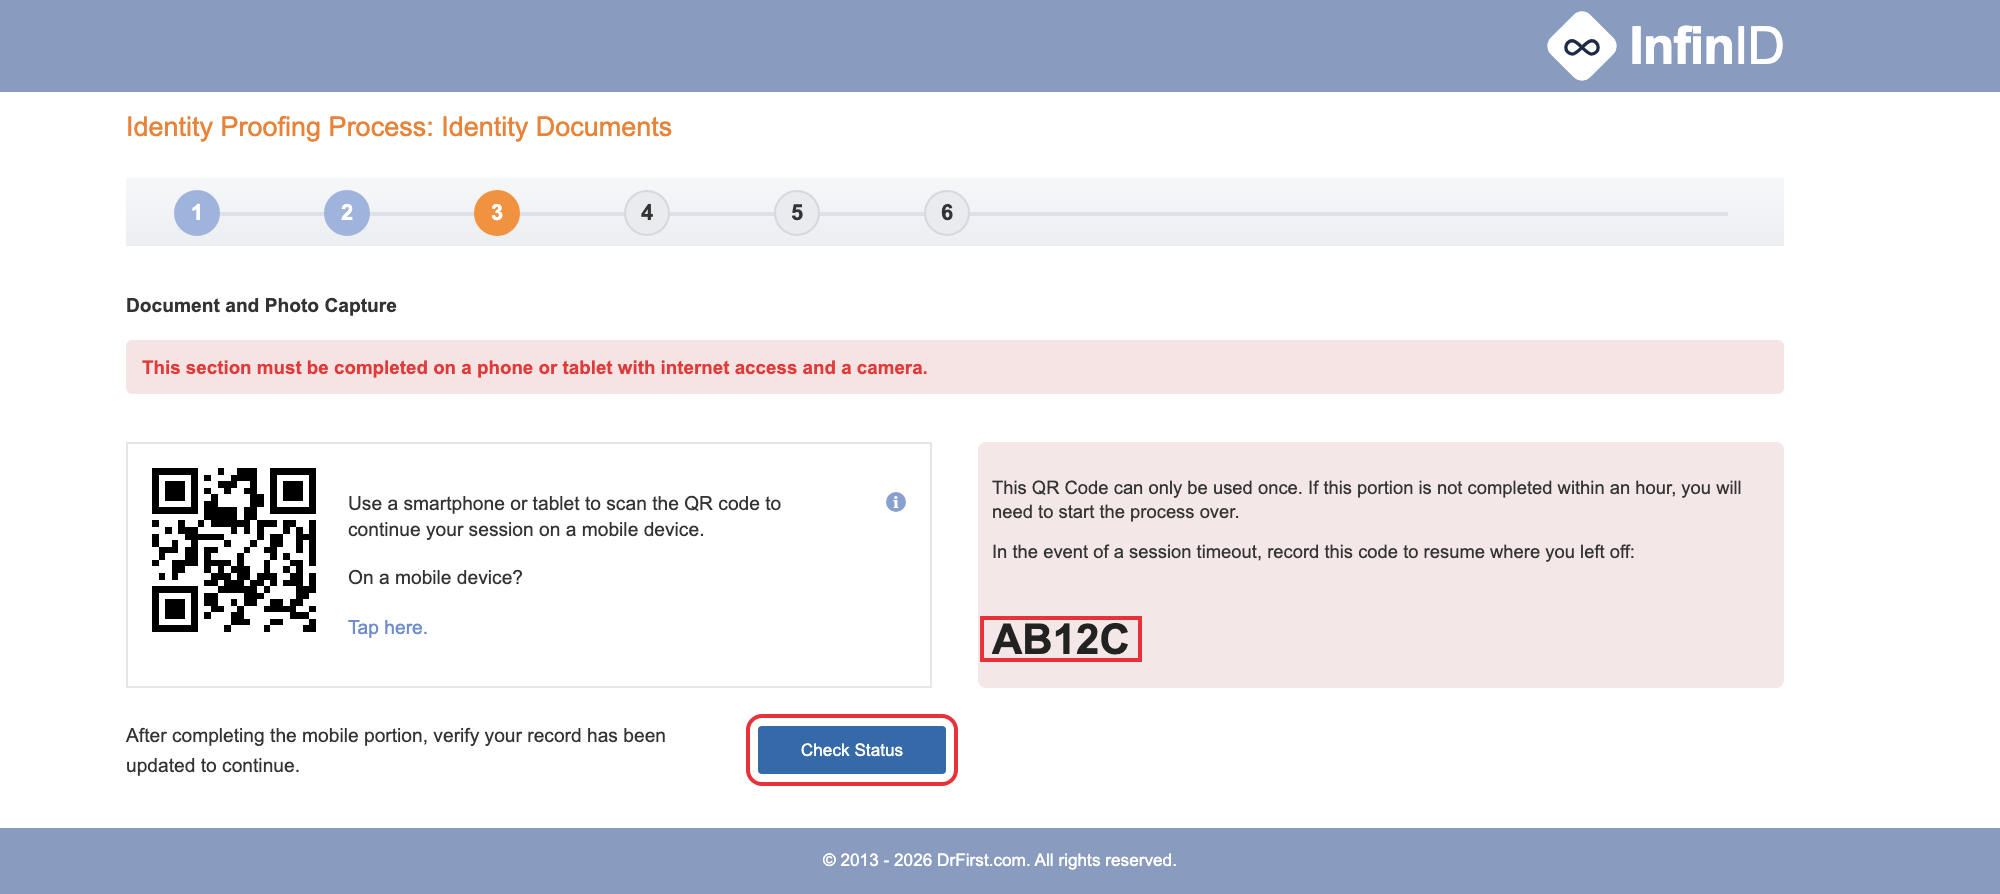
DrFirst shows a QR code and a session code.
Save the session code. If your session times out, it lets you pick up where you left off.
Open your phone's camera and scan the QR code.
On your phone, follow the prompts to photograph your ID and take a selfie. The QR code works only once, and this part must be finished within an hour.
When your phone says you're done, go back to your computer and click Check Status. If it says it's still waiting for your identity, wait a minute and click it again.
Step 7: Register your token
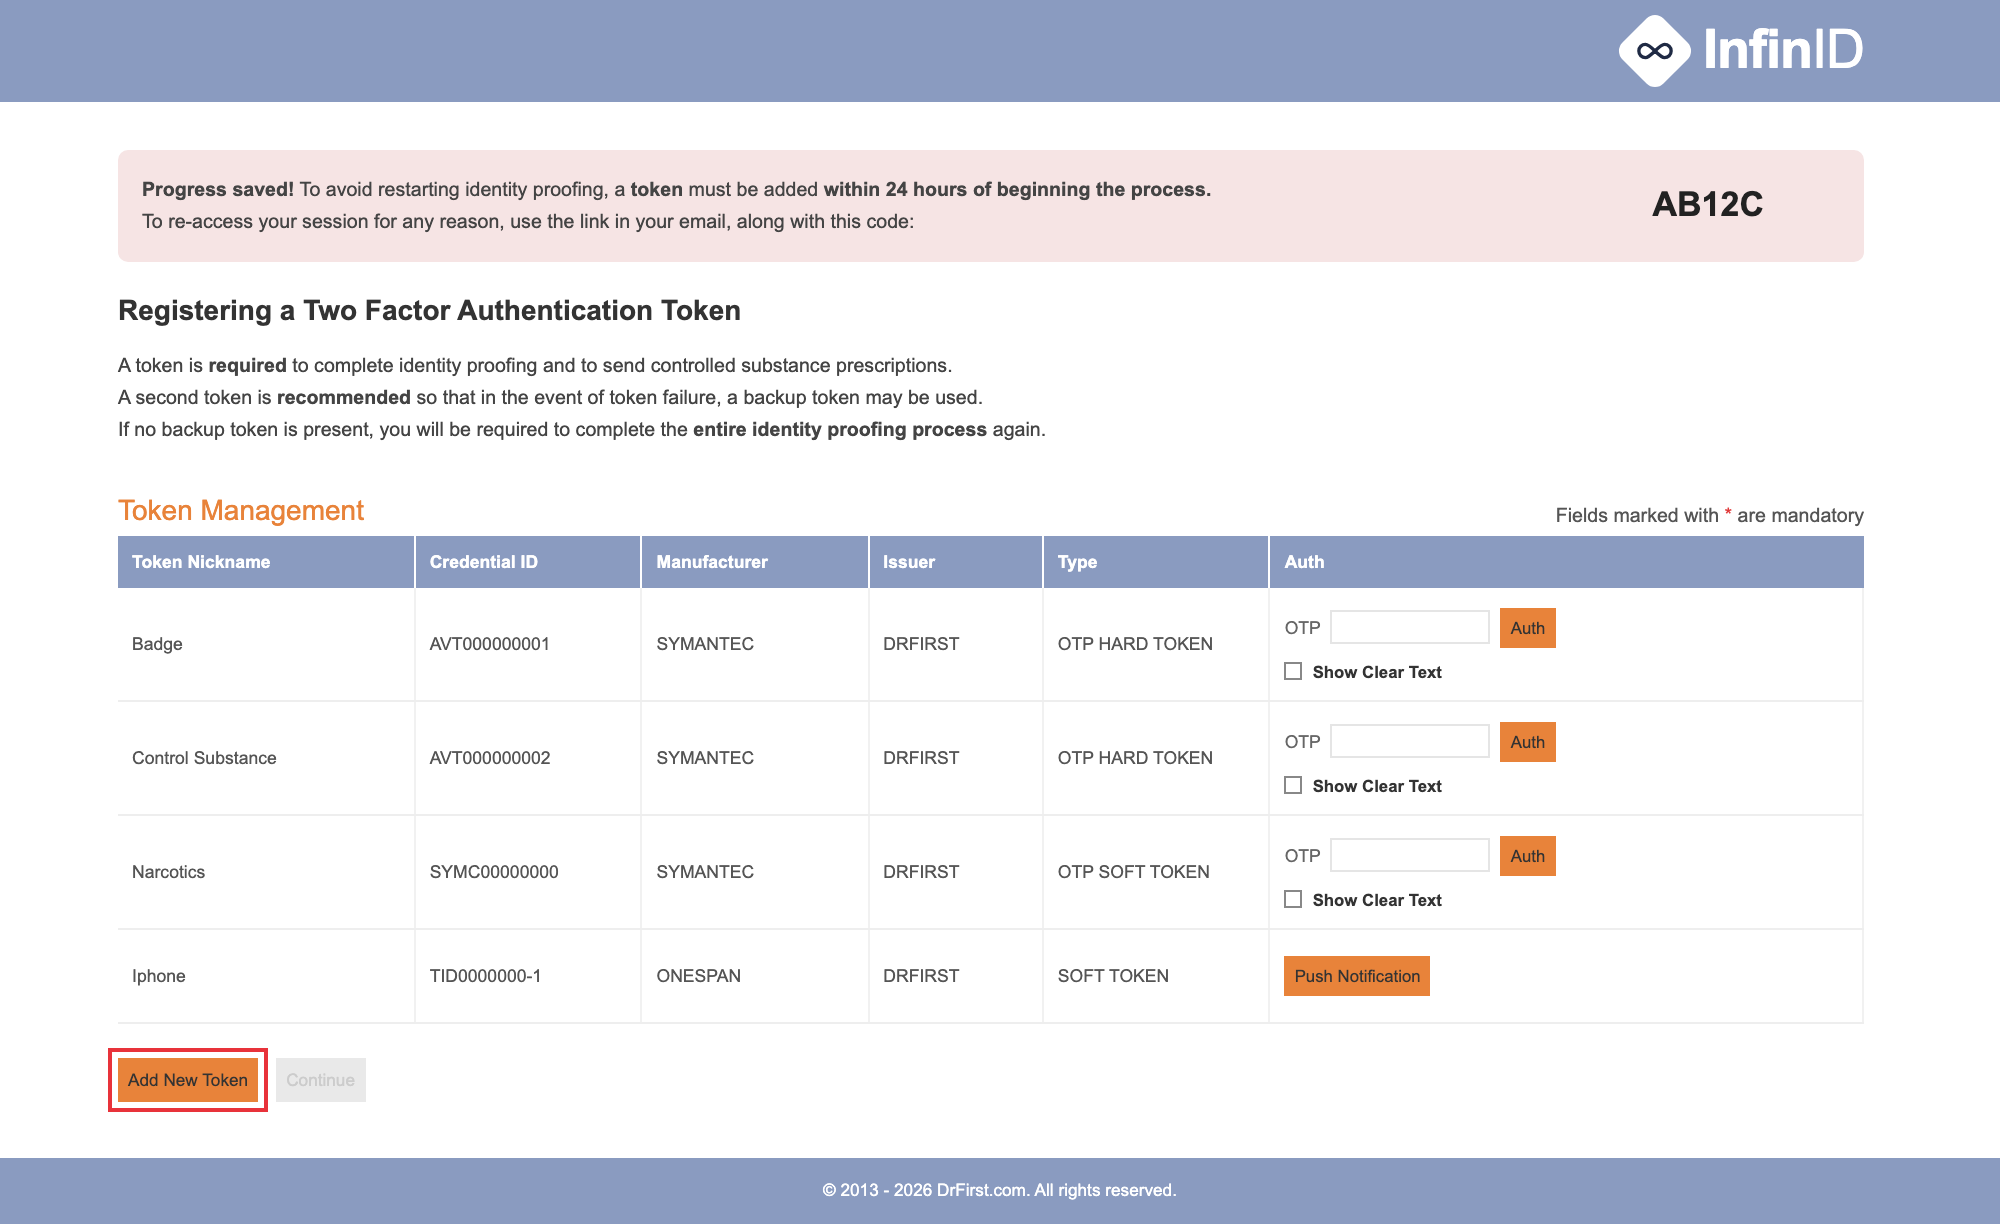
When identity proofing succeeds, you'll see Progress saved! with your session code. You have 24 hours from when you started to add a token.
Click Add New Token. If you've used DrFirst before, you may see old tokens in the list. You can leave them there.
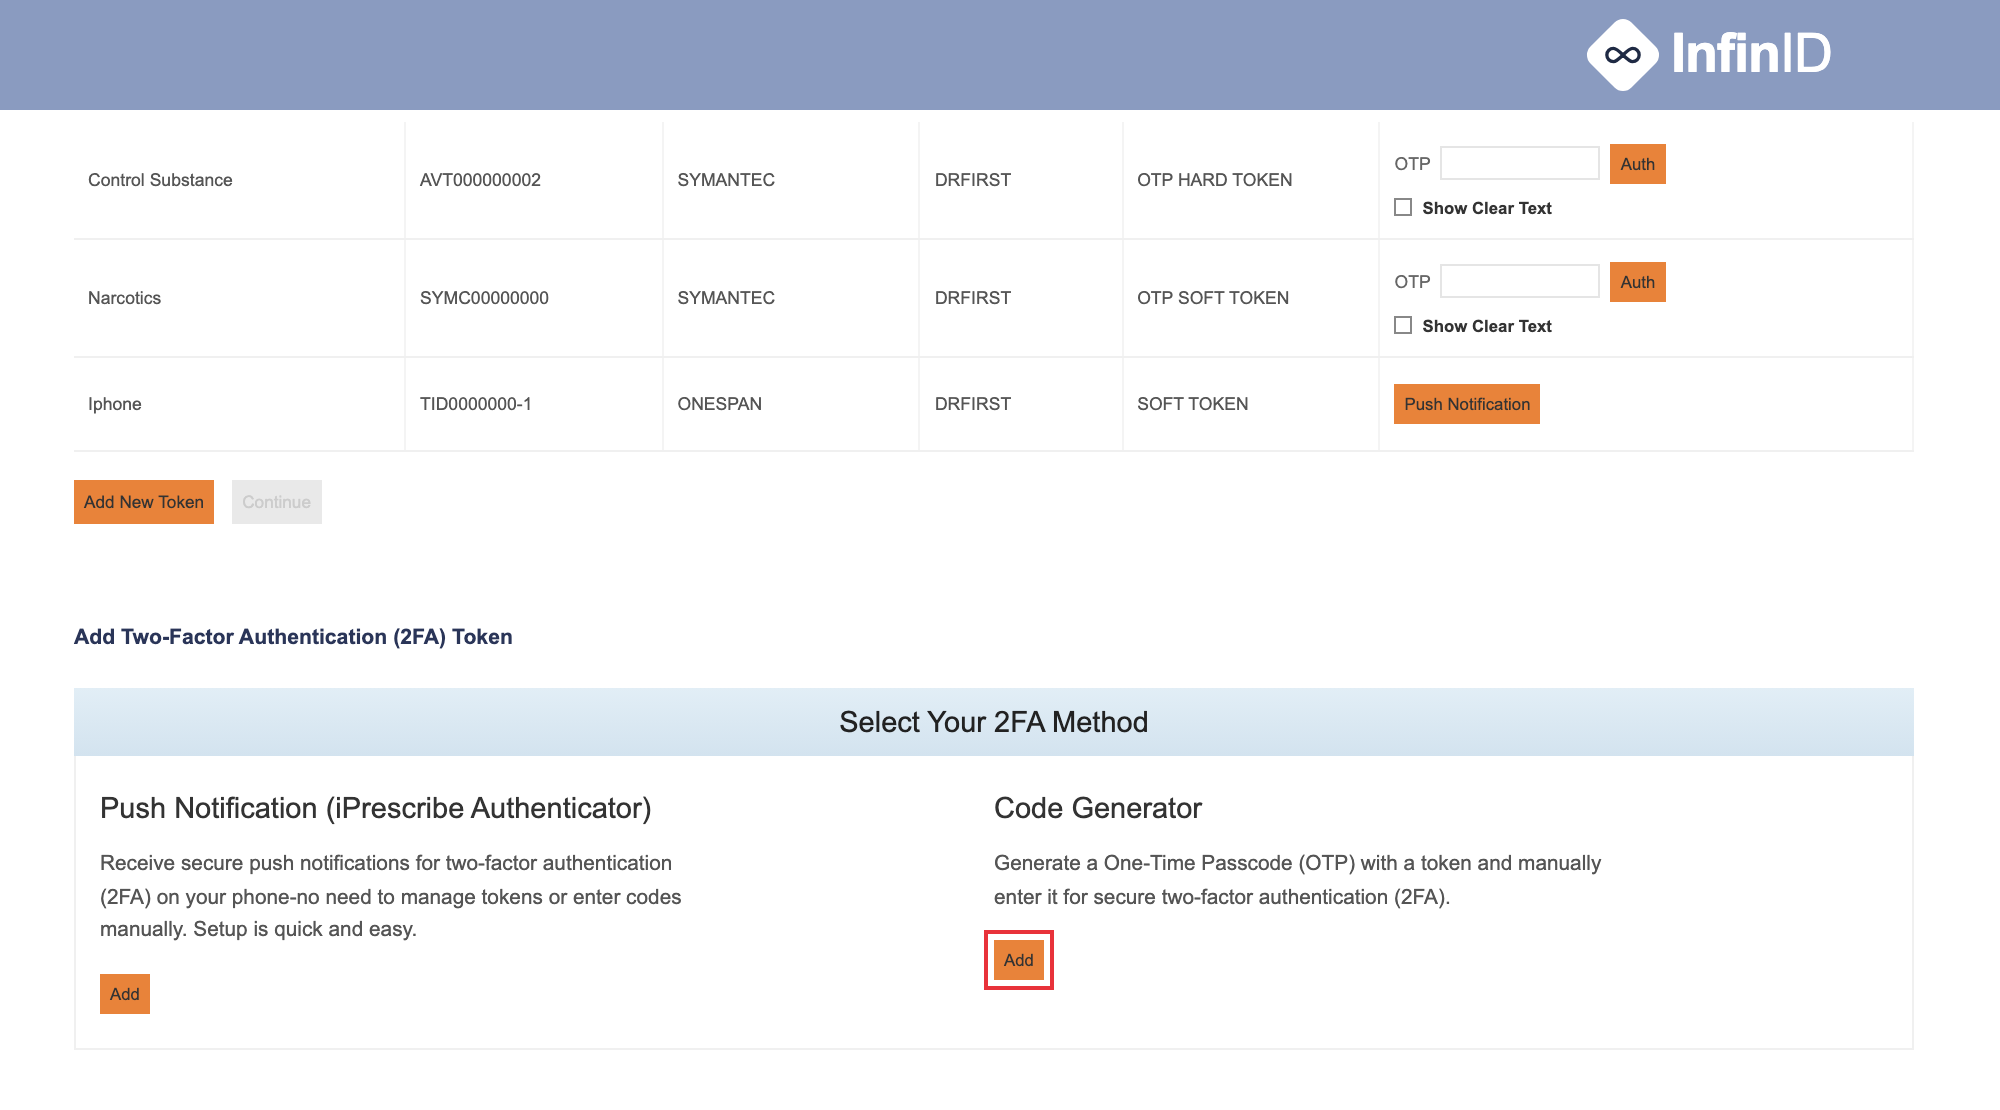
Under Code Generator, click Add.
Don't choose Push Notification (iPrescribe Authenticator).
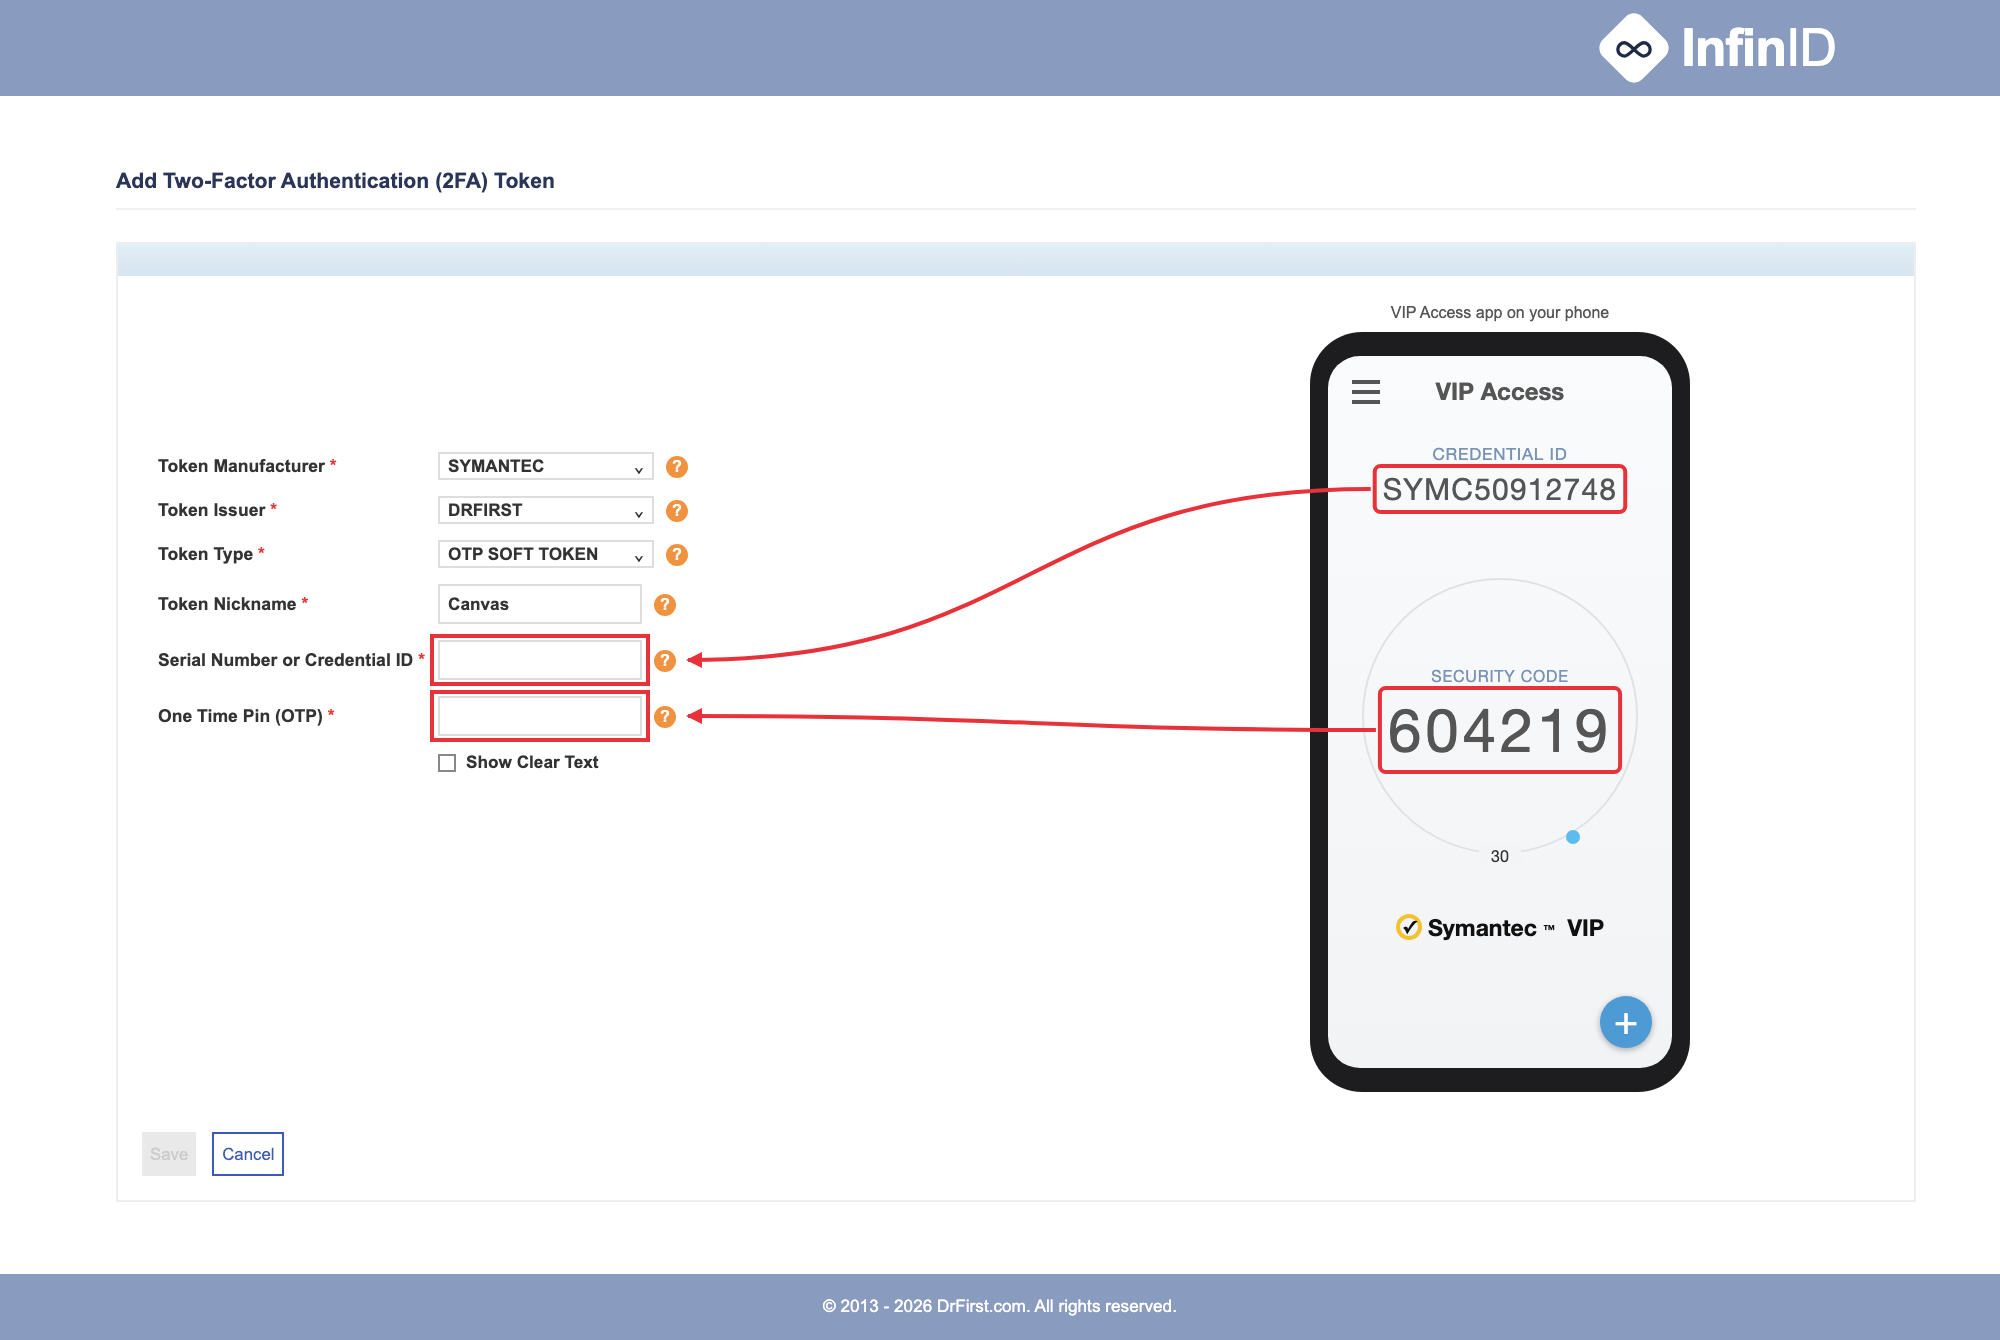
Fill in the form:
Token Manufacturer: SYMANTEC
Token Issuer: DRFIRST
Token Type: OTP SOFT TOKEN
Token Nickname: anything that helps you recognize it, like "Canvas"
Serial Number or Credential ID: the Credential ID shown in your VIP Access app, starting with SYMC. Type it with no spaces.
One Time Pin (OTP): the current 6-digit code in VIP Access that changes every 30 seconds.
Click Save.
Your new token shows ACTIVATED, and the Continue button becomes clickable. Click Continue.
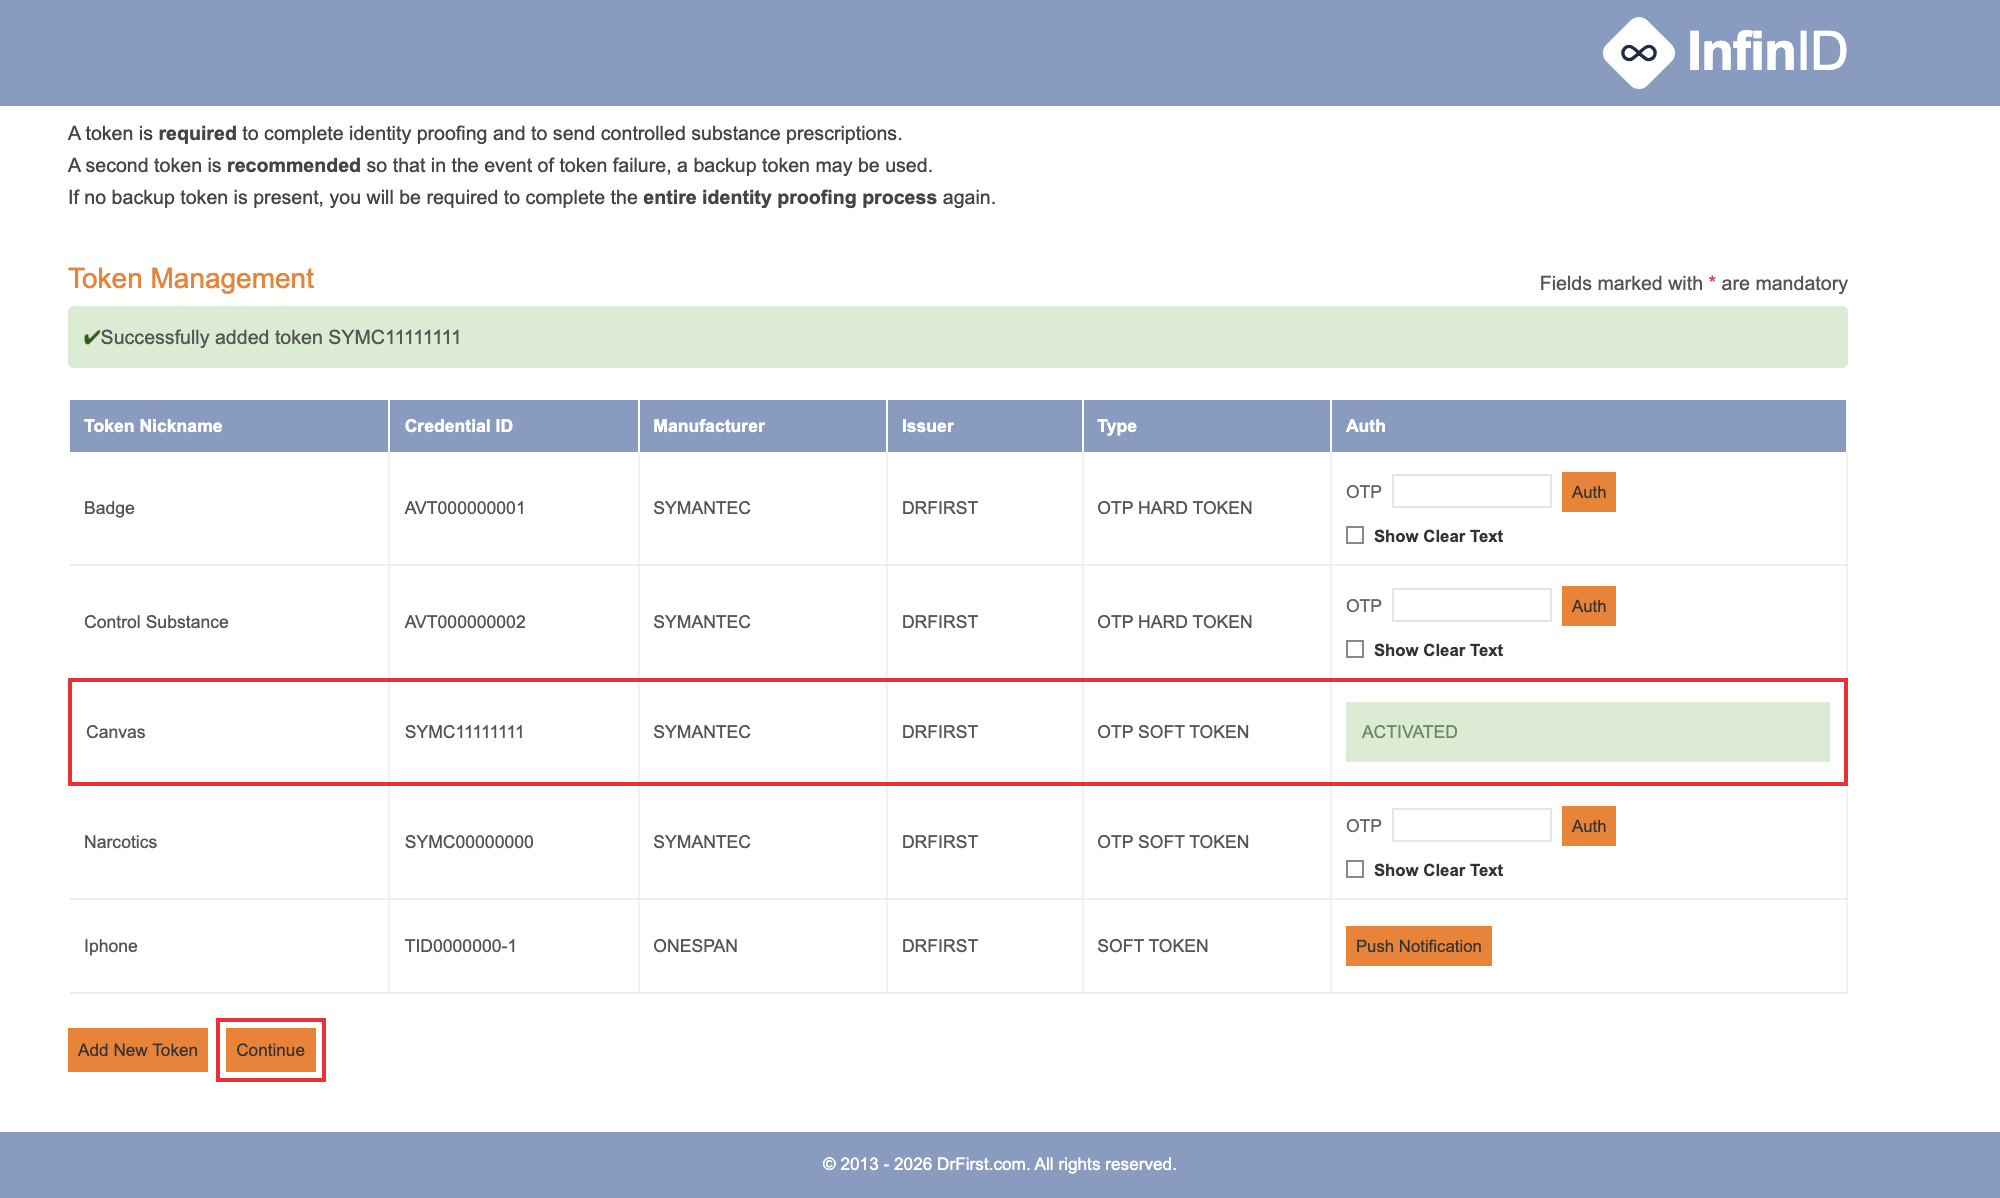
Your Canvas token starts with SYMC. If DrFirst ever shows you more than one token (for example, one starting with TID), always pick the SYMC one for Canvas.
Step 8: Create your passphrase and security question
You'll enter this passphrase every time you sign a controlled-substance prescription. Fill in all four fields: Passphrase, Confirm Passphrase, Security Question, and Security Answer. DrFirst uses the security question if you ever need to recover your passphrase.
Your passphrase must have:
8 to 20 characters
At least 1 uppercase letter, 1 lowercase letter, and 1 number
No special characters (no
*,!,#, and so on)No more than 2 of the same character in a row
This screen may accept a passphrase with special characters, but it will fail later with "Authentication failed. Access is denied." Stick to letters and numbers, and store your passphrase in a password manager.
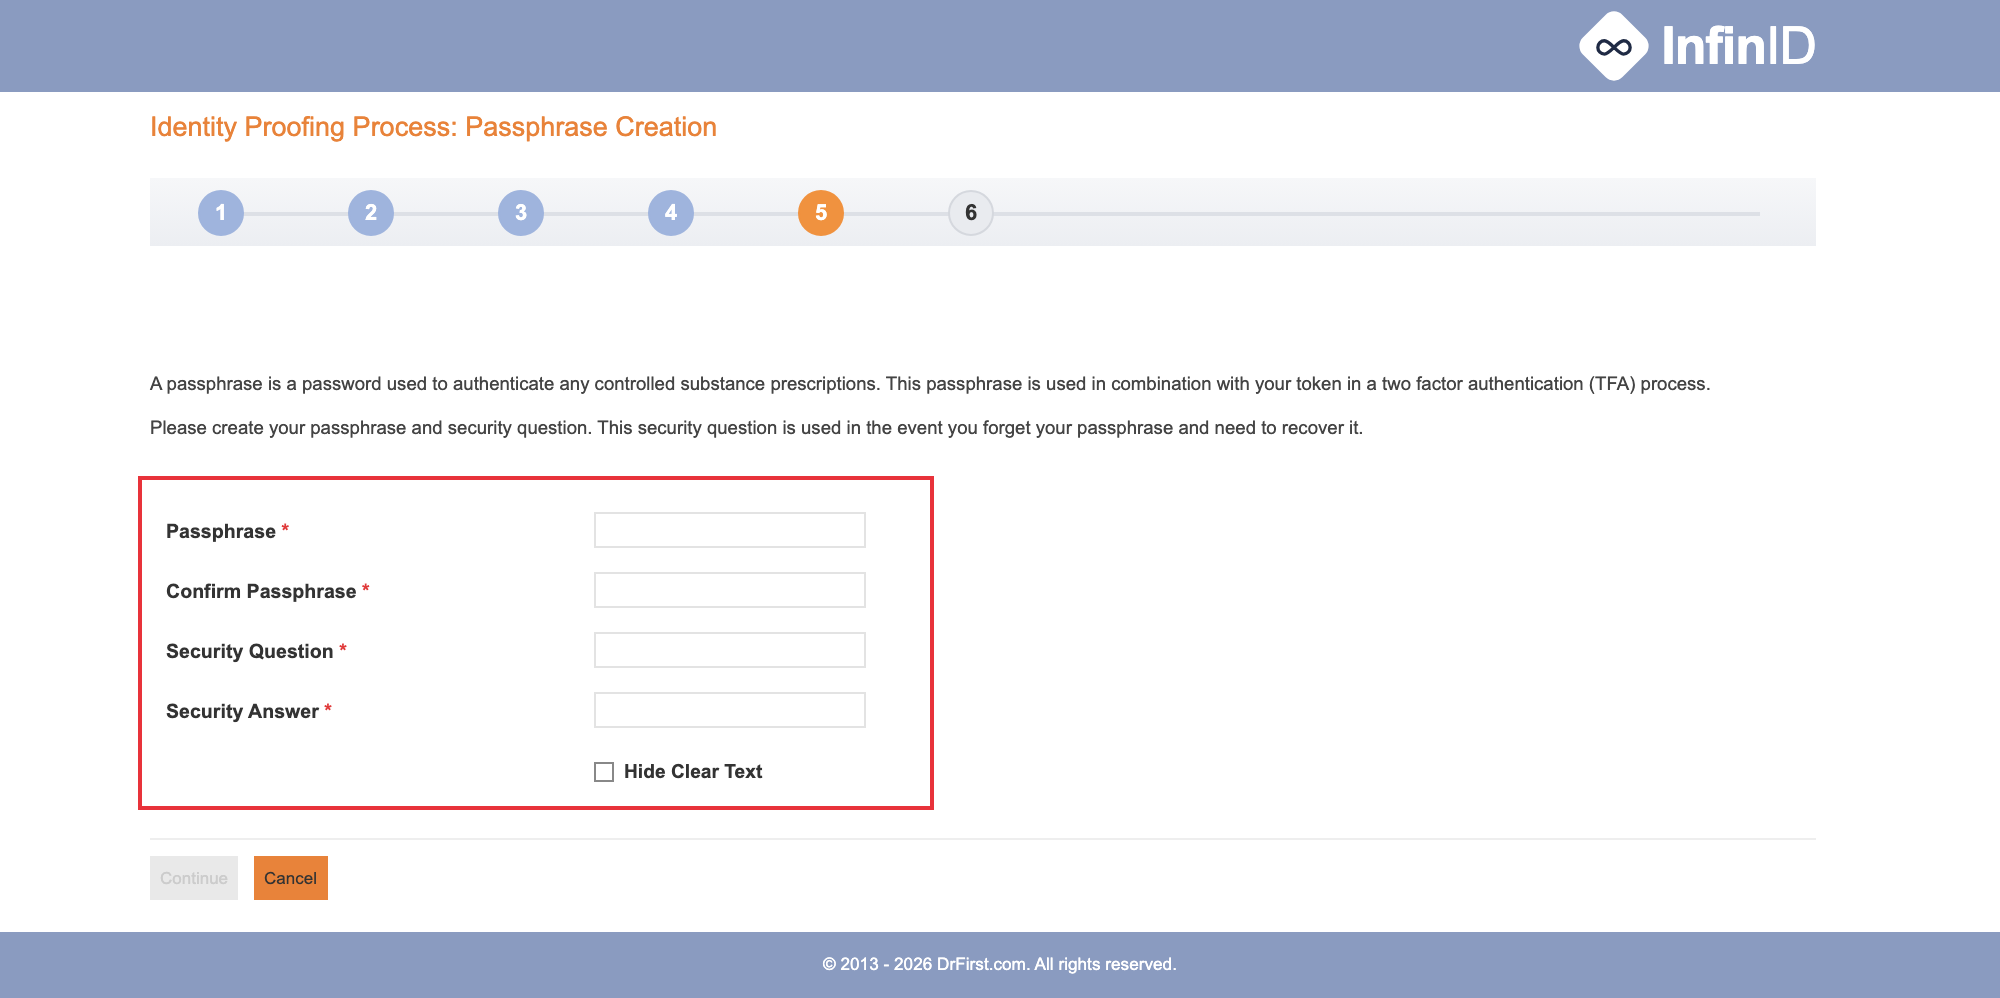
Step 9: Enter your verification code
DrFirst texts a code to the mobile number you entered. It can take up to 5 minutes to arrive. Type it into Verification Code and click Continue. If it doesn't come, click Didn't receive your code?
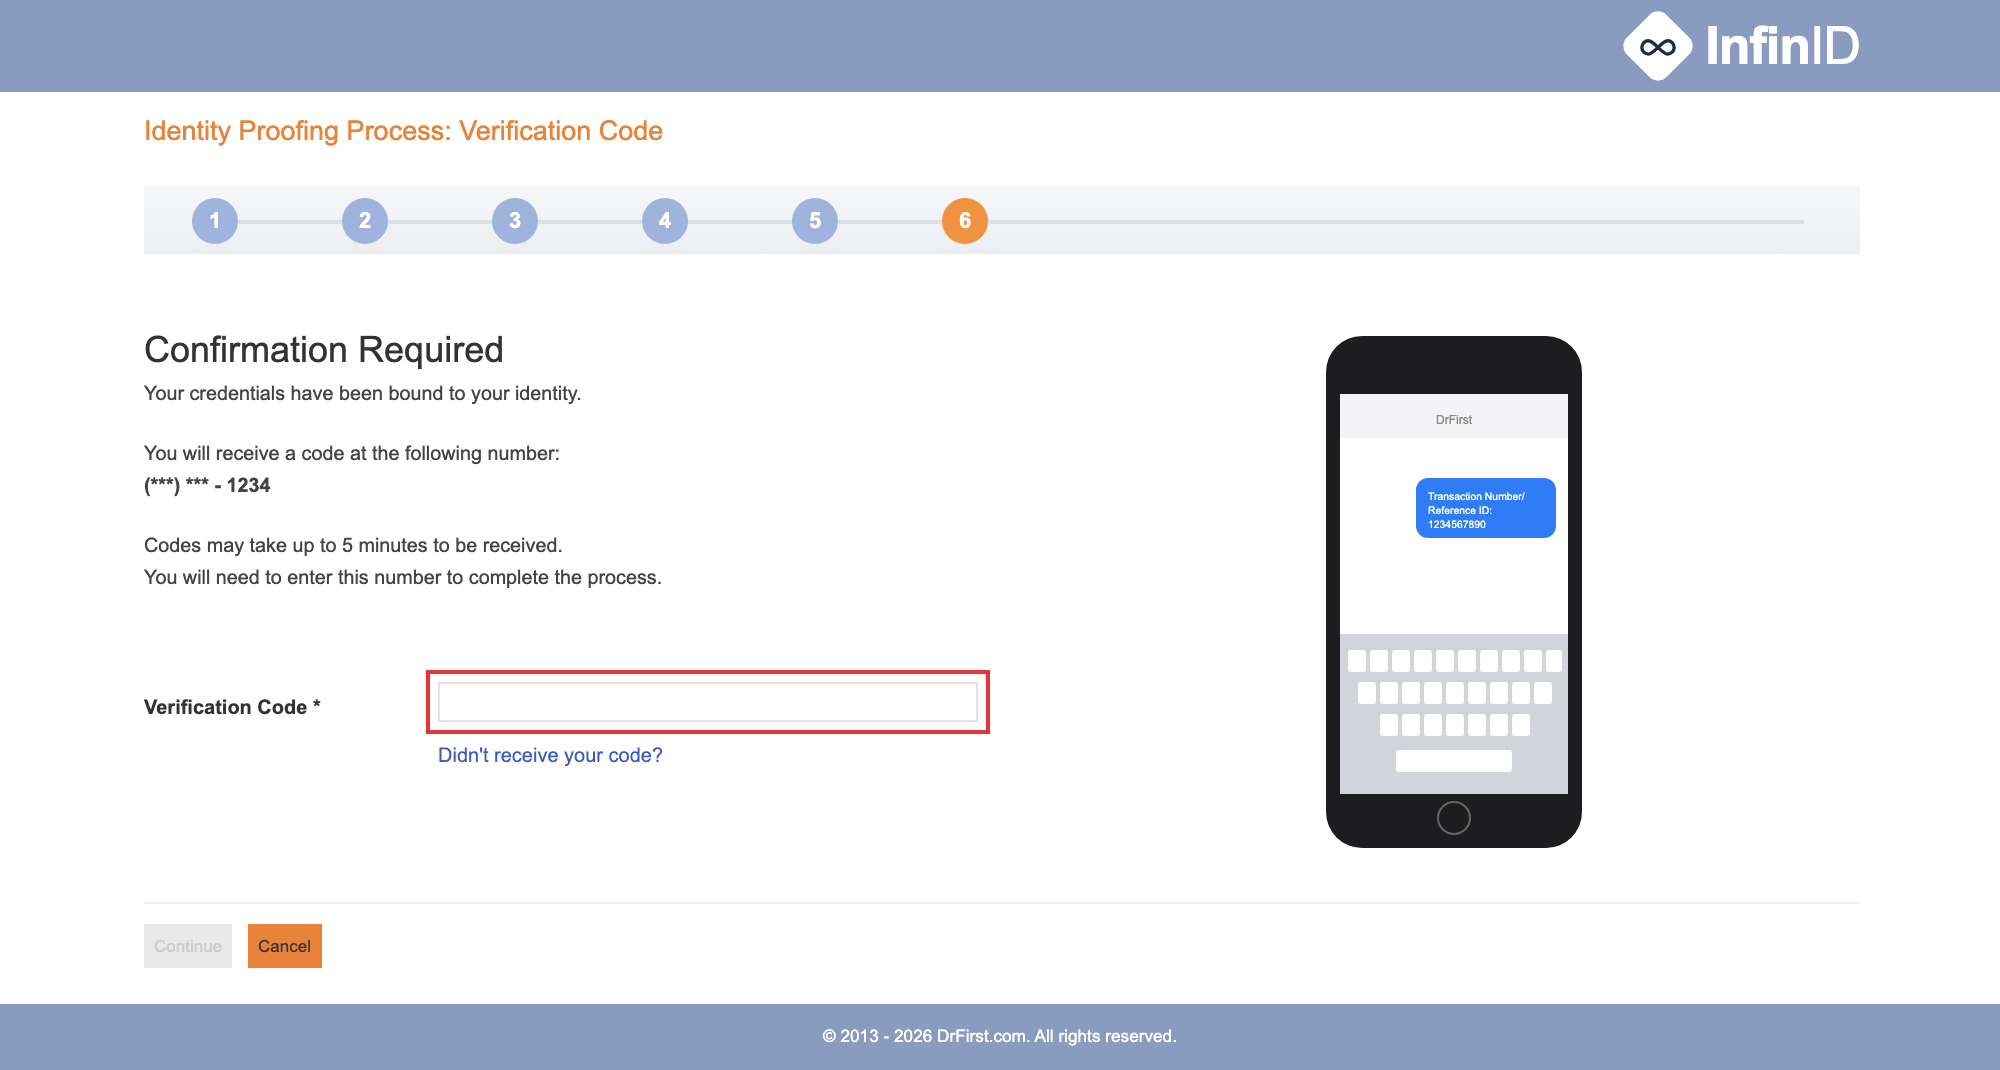
Step 10: You're done enrolling with DrFirst
You'll see Congratulations! You have completed the Identity Proofing and EPCS Enrollment Process! Your part on DrFirst is finished. Before you can prescribe controlled substances, your practice's EPCS administrator has to grant you access.
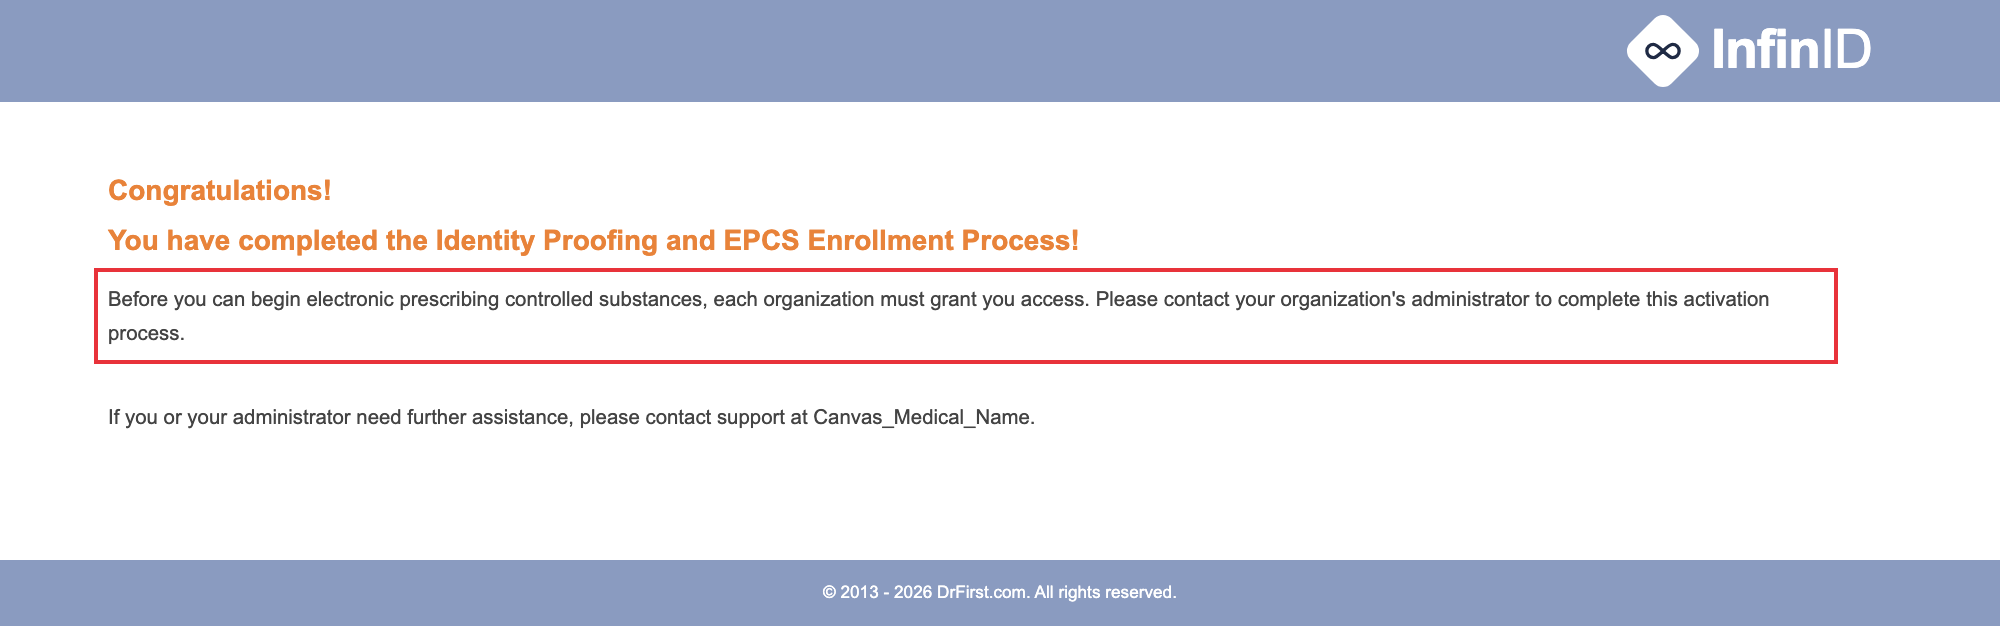
Step 11: Activate your access with your EPCS administrator
Tell your practice's EPCS administrator you've finished enrollment. You'll need to be available at the same time, because you'll give them your passphrase and a fresh VIP Access code while they enter them. Your administrator's steps are in Activating EPCS Grants with DrFirst.
Your administrator searches for you by name or NPI in DrFirst.
They select your SYMC token.
You give them your passphrase and the current code from VIP Access.
The admin clicks Authorize before the code changes.
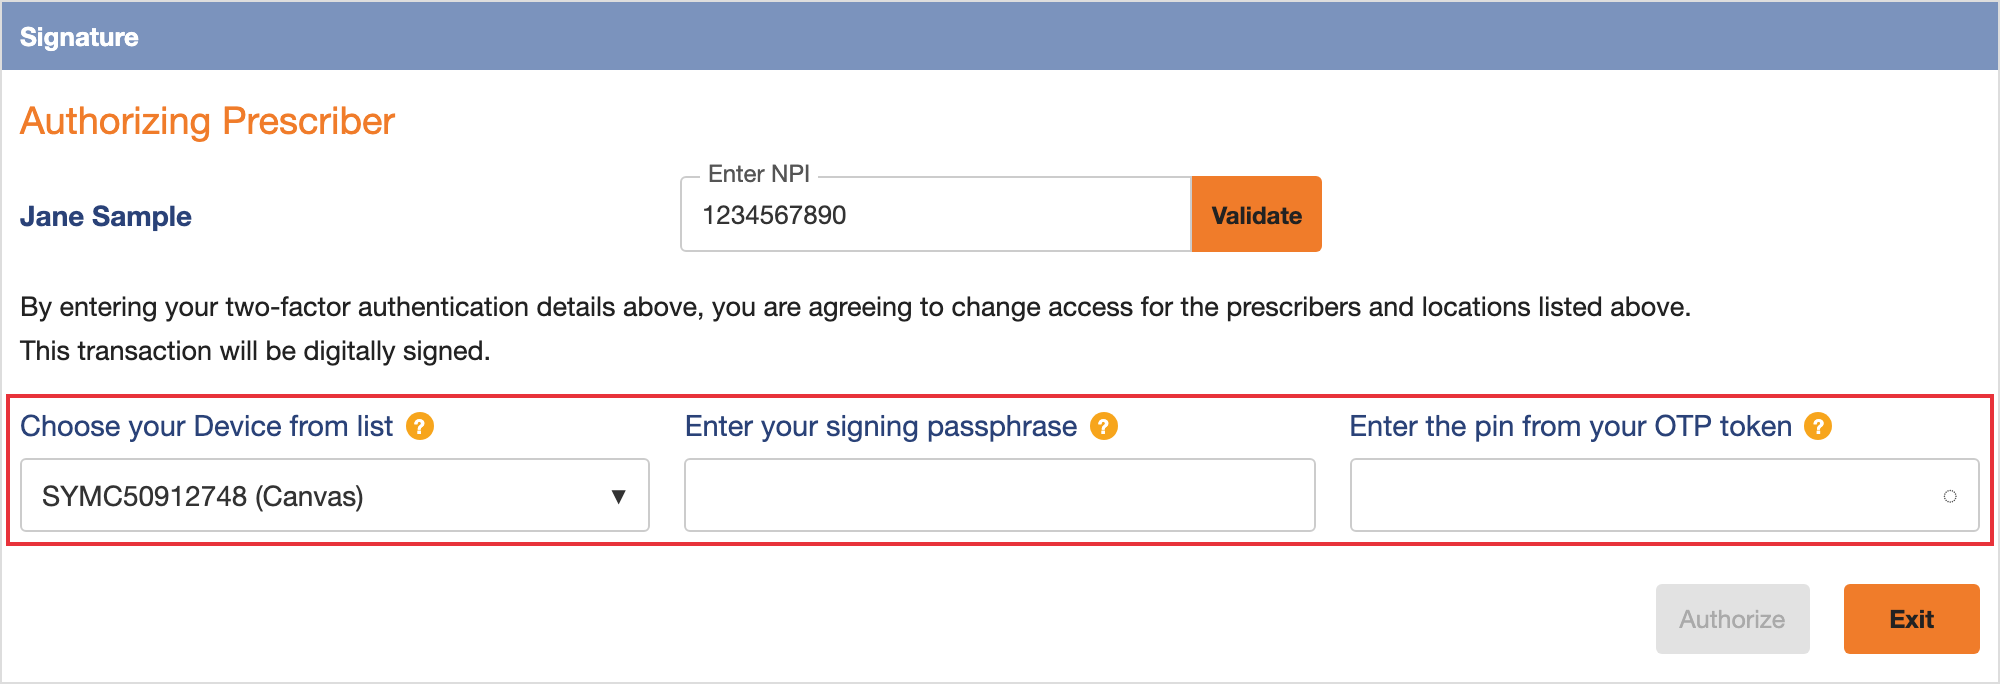
If your administrator can't find you right after you finish, have them refresh the page and try again in a few minutes.
Step 12: Wait for Canvas Support to finalize setup
After activation, tell Canvas Support to finalize your enrollment. This can take up to 24 hours. Your EPCS administrator will let you know when you're ready.