Working with the Onboarding Agent
Last updated: November 5, 2026
Onboarding is where you and your Canvas team manage your implementation. You can track projects and activities, manage assignments and deadlines, and use the Onboarding Agent to complete tasks, submit forms, and securely share credentials. An implementation can be a new location, a move off another system, or a second instance. Onboarding appears in the sidebar while your organization has an active implementation.
Access and Roles
Role | Onboarding | Studio |
|---|---|---|
Onboarding admin | Manage projects, activities, and chat | No access |
Studio admin | Manage projects, activities, and chat | Access all projects and Studio settings |
You can assign the Onboarding admin role to implementation leads who need to manage onboarding without building in Studio.
Your role must also be linked to your staff member in your Canvas instance. An Organization admin assigns roles on the Users page. See Users and Roles.
Open Your Implementation
Select Onboarding from the sidebar.
Under In flight, review your implementation's name, go-live target, lead, instance, completed activities, and overdue activities.
Click Open to access your implementation.
Choose a view:
Projects: View projects, their progress, and the Onboarding Agent chat.
Kanban: View all activities across projects, organized by status.

Manage Activities
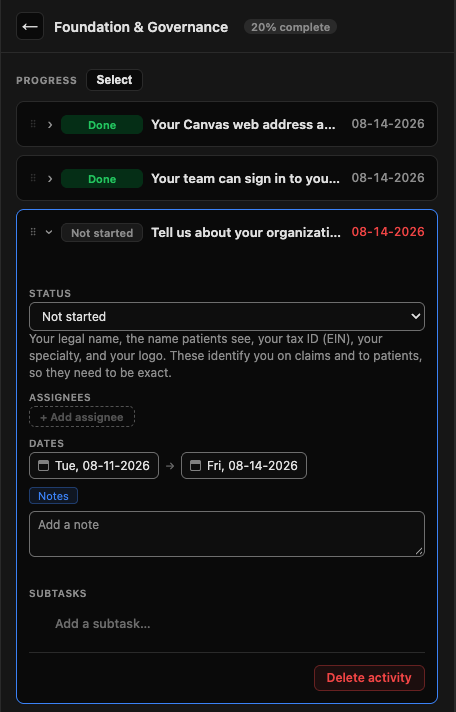
Each project contains activities that make up your implementation. Open a project to view its activities and progress, then select an activity to manage its details.
Within an activity, you can:
Update status: Select a status under Status.
Assign work: Add or change people under Assignees.
Set deadlines: Select Set a start date or Set a due date. Past-due activities appear as overdue.
Add notes: Use Notes to share information with everyone working on your onboarding.
Create subtasks: Enter a task under Add a subtask.
Add or remove activities: Use Add an activity and click Add, or select Delete activity.
Use the Kanban Board
The Kanban board organizes activities by status.
Status | Meaning |
|---|---|
Blocked | Waiting on someone outside the activity. See Notes for the reason. |
Gated | Waiting on another activity. Automatically moves to Ready to Start when the dependency is complete. |
Ready to Start | Ready for work to begin. |
In Progress | Work is underway. |
Done | Activity is complete. |
You can also:
Change status: Drag an activity to another column. Gated activities cannot move until their dependencies are complete.
Assign yourself: Click + on an activity card.
Filter activities: Use Assignees to view someone's work or Overdue only to find late activities.
Activities marked N/A are removed from the board and excluded from progress calculations.
Chat with the Onboarding Agent
The Onboarding Agent is available in the Projects view. Switch from Kanban to Projects to open chat.
Chat | Where to find it | Who can see it |
|---|---|---|
Personal Chat | Onboarding Projects overview | Only you |
Shared Chat | Inside each project | Your onboarding team, including Canvas |
In Personal Chat, ask "What should I work on next?" to see upcoming activities. Click Assign to me to take ownership of an activity that isn't assigned to you.
If your question belongs to another project, the agent offers to send it to the appropriate project.
Start or Resume an Activity
Find the activity in its project or on the Kanban board.
Click Start or Resume to open Shared Chat.
Start asks what information is needed to begin.
Resume reviews what's completed and what's outstanding.
Follow the prompts to answer questions or complete forms.
When the agent first saves a change to an activity that hasn't started, its status automatically changes to In progress. Manually set statuses are preserved.
Note: Gated and completed activities don't have a Start button. Gated activities must have their dependencies completed first.
Share Files
Click the paperclip beside the chat message box or drag files into chat. The agent reviews attachments along with your message.
Supported formats: Images, PDF, Word, Excel, PowerPoint, CSV, text, Markdown, JSON, YAML, and TOML.
File limit: 10 MB per message. Send additional files in separate messages.
If a vendor requires paperwork, the agent may provide a form with a Download button. Complete the form and upload the finished PDF in chat.
Complete Forms and Submit Credentials
Complete Forms
When information is needed, the agent displays a Complete your [form name] card.
Open the form by clicking the card.
Review auto-filled fields. Edit values as needed or select Clear pre-filled.
Click Submit to Canvas to save your answers to your onboarding record.
Select Dismiss this form to close it without submitting. If you've entered information, you'll be asked to confirm.
You can also find forms grouped within each project, with progress shown for each activity. Click Open form to view a form in a tab beside chat.
Sending forms to staff
In some projects, the agent can email forms using individual, one-time links. Select Recipients, add an optional message, set Link expires after, and click Send to [number] recipients.
[Screenshot: A form card open in chat]
Submit Keys and Passwords Securely
When credentials are needed, the agent displays an Enter [vendor] key securely card.
Enter the credentials and click Submit securely. The card confirms when the information is saved.
Important: Never enter keys or passwords in the chat message box. Secure cards send credentials directly to Canvas, where they are not visible to the agent.
Track Practice Implementations (MSOs)
If your organization is an MSO, anyone with a role at the MSO sees Onboarding, which includes a Practice implementations view to track onboarding across your practices.
Each practice appears in a row showing:
Percentage of activities completed
Users and messages from the past 7 days
Progress for each project
Overdue activities, highlighted in red
Use All, In progress, or Not started to filter practices. Metrics refresh every 15 minutes.
Click a practice to open its Onboarding, where you have access.
Frequently Asked Questions
Why don't I see Onboarding in my sidebar?
Your organization may not have an active implementation, or you may be missing the Onboarding admin or Studio admin role. Ask an Organization admin to review your access or contact your Canvas team about starting an implementation.
Why is Start a new implementation disabled?
Your Canvas team creates implementations, and your organization already has one in flight.
Can I change the go-live target or implementation schedule?
No. Your Canvas team manages the go-live target and schedule used to generate activity dates. You can update start and due dates for individual activities.
Why doesn't an activity have a Start button?
The agent may not support the activity yet, or the activity may be gated or completed. You can manage it directly on the board.
Can teammates see my Personal Chat?
No. Personal Chat is visible only to you. Use Shared Chat for conversations your onboarding team should see.
Why does Onboarding say it's unavailable until the AI Agreement is complete?
Onboarding uses Canvas AI, which requires your organization's AI Agreement. Click Send AI Agreement for Reviewin the notice to send it to an authorized signer. If an MSO manages your organization, the MSO completes the agreement.
Can I receive email notifications when work is assigned to me?
Yes. Click the bell at the top of the page and enable Work assigned to me. Notifications are off by default. Once enabled, an email is sent a few minutes after an assignment to avoid notifications from accidental changes.